Editing activity and decision data
Prerequisites
- Access to the File > Process (PM022) menu.
- Previously created process.
- Previously designed flowchart.
Introduction
This article will only cover the editing of user activities, system activities, or decisions.
To learn how to configure the data of activities of the Send message, Message receiving (start), Message receiving, Manual, Business rule, or Script execution type, access the Editing activity data article.
Before editing the data of an activity or decision, make sure it has already been saved in the flowchart; otherwise, when attempting to open the data, the system will display a message stating that the record was not found.
See below how to edit and configure activities or decisions in a flowchart:
Editing data
1. To edit the data, select the activity or decision in the flowchart and click on the Data button that will be enabled in the button bar of the designer.
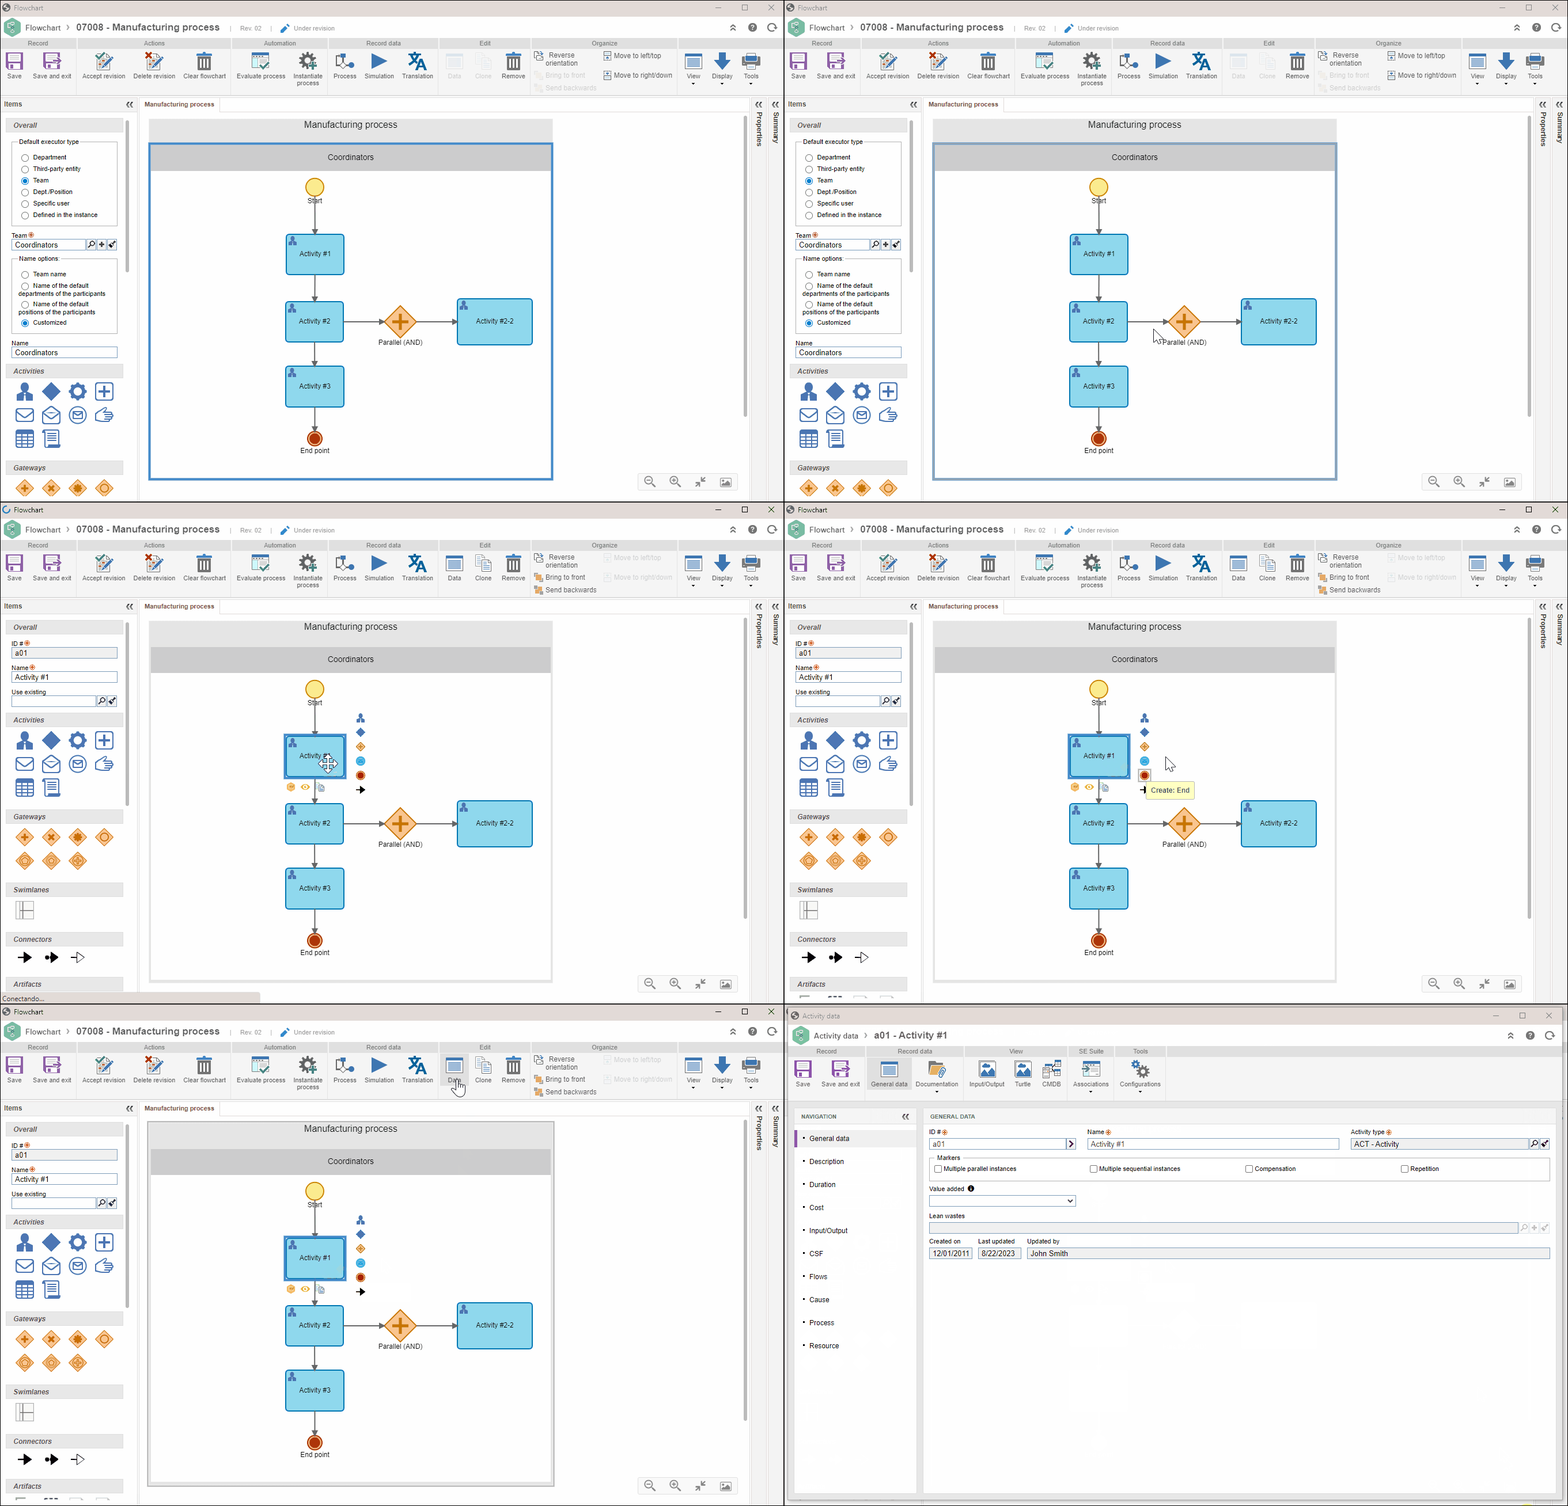
2. At this point, the data screen of the activity or decision will be displayed. See below how to edit the data on those screens:
Editable data on the General data tab on the toolbar
Sections on the General data tab
Fill out or edit the following fields:
ID #: this field is automatically filled by the system with an automatic ID # or the ID # defined in the General section of the Items panel as soon as the activity has been saved in the flowchart. If you prefer, use the arrow next to this field to generate another automatic ID #. If the identification mask usage is configured in the process type, the ID # is generated according to the mask. The ID # generated by the mask may only be edited if the "Enable ID # change" option is checked on the process type data screen.
Name: this field will display the activity name, which was defined in the General section of the Items panel once the activity was added to the flowchart.
Activity/Decision type: this field will be filled out with the activity or decision type, defined as default in the General parameters. If necessary, the type can be changed. When switching the activity or decision type to a type that is configured with an identification mask, it is required to generate a new ID # for the activity if you wish for the ID # to be standardized.
Value added: in business processes, activities must be classified as value added or non-value added. Generally, in more than 50% of the cases, the activities are not value added or the companies are unwilling to pay for them. Activities that are non-value added must be analyzed and classified in a category of lean waste. Therefore, if the "Yes" or "Mandatory" option is selected, it indicates that the activity in question is value added. However, if the "No" option is selected, the Lean wastes field will be enabled to allow associating the lean wastes of the activity.
Markers: BPMN specification has three marker types for activities: Multiple instances (parallel or sequential), Compensation, and Repetition. The goal of activity markers is to indicate the specific behavior of an activity during its execution. Select the desired markers for the activity.
System activity
The fields below will only be enabled for system activities in the General data section. In the system activity, the responsible for the execution is the system itself, and there is no interaction required between the end user and the activity execution.
Execution: select the execution mode of system activity:
- Synchronous: once it is enabled, it can call an external application, update process attributes and, at the same time, continue with the flow.
- Asynchronous: once it is enabled, it can also call an external application and update process attributes. However, it awaits the call of a workflow API to execute the activity and continue the process flow.
Integrations: select how the activity will be executed:
- SE Suite application: select this option to define an SE Suite application as the executor of the system activity. By clicking on the Configure SE Suite application option, there will be some SoftExpert Suite application options available for integration. Access the Configuring an SE Suite application article for further details.
- External application: select this option to define an external application as the executor of the system activity.
- Web Service: this option is available only when accessing the data of the activity through the process flowchart. When you select this option, click on the Web Service configuration button to use the process attributes in the input and output values from the system activity Web service.
- Image processing: check this option for the activity to execute a recognition profile from SoftExpert Capture. This feature allows recognizing texts from the attached image to fill out form fields and/or attributes. When selecting this option, click on the "Processing configuration" button to open the processing configuration screen for the attached image.
- Electronic signature: this feature sends a system activity with a document to be signed that is in the revision process in SoftExpert Workflow, a document that is the requirement of an activity, or a document that instantiated a workflow. See further details in the Configuring the digital signature of documents article.
Formula: through the fields in this section, it is possible to define formulas that will be called before or after executing the activity.
-
Before execution: click on the
 button to define the formula that must be executed before the execution of the system activity.
 -
After execution: click on the
 button to define the formula that must be executed after the execution of the system activity.
Description
Enter a description for the activity/decision. The description given in this field will be displayed in the activity/decision execution screen in the SoftExpert Workflow component. Therefore, this section can be used to describe what must be done to execute the activity.
Duration
Use this section to set the duration configuration to be used for this activity or decision. For that, select one of the following options:
- Use waiting time: if this option is checked, it will be possible to set the waiting time (time in which an activity is enabled until it is started) and the working time of the activity. Thus, fill out the Working time field to define the duration of the activity. Fill out the Waiting time field to define the waiting limit before the activity is started.
If this option is not checked, the activity will not have a closure deadline, or it may have a fixed duration. For the activity not to have a deadline, keep the Fixed duration field blank. For the activity to have a closure deadline, fill out the Fixed duration field with the estimated deadline for the duration of the activity/decision.
- Dynamic duration: select this option to have the duration of activity to be set dynamically. The following options are available for dynamic duration:
Formula: if this option is selected, the duration of the activity will be defined through a formula. To do so, click on the  button and enter the rule that defines the activity duration in the formula editor.
Apply the same deadline as of the instance: if this option is selected, the duration of the activity will be the same duration defined for the process instance.
If this option is not checked, the duration of the activity will not be defined dynamically. If the activity must have a defined deadline, configure the desired time in the Fixed duration field.
- Use default calendar: if this field is checked, the calendar set as default through the SoftExpert Administration component will be used to calculate the schedule of the activity/decision. If this option is not checked, the Calendar field will be enabled, and completing it will be mandatory. In this case, select the calendar that will be used to calculate the schedule of the activity/decision.
Cost
In this section, the costs for the execution of the activity/decision must be associated.
Input/output
In this section, all inputs and outputs of the activity/decision must be associated. See how to add materials and/or information to each subsection:
CSF (Critical Success Factors)
Use this section to create the Critical Success Factors of the activity/decision. See how to create and associate a new CSF.
Flows
This section displays the input and output flows of the activity/decision. Through this section, it is possible to edit the data and switch, for example, the happy path type to exception path. See more details about this configuration in the Flows (connectors) section.
Cause
In the Analysis tool section, the user can enter the analysis record through the 5 Whys, FTA, and Ishikawa tools. A new analysis may be created or an already existing analysis may be associated. To add an analysis, click on the desired tool: 5 whys, Ishikawa, or FTA. To associate an existing analysis, click on Associate.
Use the Cause section to associate the causes of the defects or problems of this activity/decision. To do that, click on the  button and, on the screen that will be opened, fill out the following fields:
- Cause: select the cause and enter whether it is the root cause or the potential cause of the defect or problem. Created causes will be available; however, in this field, it is also possible to create a new cause if the user has access to the menu.
- Percentage: enter, in this field, the percentage of the selected cause in relation to generating the defect or problem in the activity/decision.
- Department responsibility: enter the department in which the cause was generated.
- Description: describe the cause of the problem or defect in this activity/decision.
Process
This section displays the process in which the activity/decision is being used.
Resource
The resources required for executing the activity/decision should be associated in this section. See how to create a resource.
Editable data on the other tabs on the toolbar
Documentation
Upon clicking on this button, it will be possible to associate attachments and documents with the activity/decision:
- Attachment: associate the attachments related to the activity/decision.
- Document: add or associate the documents related to the activity/decision.
Input/output
After associating inputs and outputs, upon clicking on this button, the input & output diagram of this activity/decision will be displayed. This diagram consists of the information and materials associated with the Input/Output section of the activity.
Turtle
Upon clicking on the Turtle button, it is possible to view the turtle diagrams of this activity/decision. This diagram consists of the activity description, resources, inputs, outputs, tasks, and indicators associated with the activity.
CMDB
By clicking on the CMDB button, it is possible to view the CMDB structure of this activity/decision. This diagram displays the relationship between the activity or the process with the assets from SoftExpert Asset.
Associations
Click on this button to access the association options for the activity/decision.
Configurations
Refer to the Activity configurations article to learn more about the resources available in this section and how to configure them.
3. After performing all desired changes in the activity or decision, save the record.
Conclusion
Thus, you have accessed all editable data of an activity or decision.
