SoftExpert Process searches
Prerequisites
- Access to the View > Activity/Decision (PM024) menu.
- Access to the View > Cost (PM025) menu.
- Access to the View > Process X I/O matrix (PM030) menu.
- Access to the View > Inter-process matrix (PM029) menu.
- Access to the View > Resource (PM026) menu.
- Access to the View > Revalidation (PM060) menu.
- Access to the View > Revision (PM027) menu.
- Access to the View > Tasks (PM028) menu.
Introduction
To facilitate controlling records and viewing recorded information, view menus are made available.
See the views available in SoftExpert Process:
View activity/decision
Allow having a detailed vision of the activities and decisions recorded in the system.
1. Access the View > Activity/Decision (PM024) menu.
2. Use the Search filters to find the desired activity/decision and click on the Search button.
3. Select the desired activity/decision in the list of records and click on the  button to view its data screen.
4. Click on More and use the  and
and  buttons to view the input & output diagram and the turtle diagram, respectively, of the activity.
Advanced search filters
Activity
- Process: specify the process that contains the activity to be viewed.
- ID #: provide the ID # of the activity/decision to be viewed.
- Name: provide the name of the activity/decision to be viewed.
- Status: expand the list of options and check the possible status in which the activity/decision is found. If configured this way, some statuses will already be shown checked, but it will be possible to uncheck them. Use the other buttons to check all available statuses and clear all selections.
-
Record user: select the user who created the activity that will be viewed. Use the
 ,
, - , and
 buttons to search for the intended user, select your own user, and clear the field respectively.
 - Duration: enter the time interval that covers the duration of the activity/decision.
Miscellaneous
-
Input: use this filter to find the record by means of information or materials
necessary for the execution of the activity/decision that will be viewed:- Information: select an input information.
- Material: select an input material.
-
Output: use this filter to find the record by means of information or materials
produced during the execution of the activity/decision that will be viewed:- Information: select an output information.
- Material: select an output material.
- Resource: select the resource used in the execution of the activity/decision that will be viewed.
- Cost: select the expense generated by the execution of the activity/decision that will be viewed.
View cost
Allows for a detailed vision of the costs obtained during the execution of the activities, decisions, and processes recorded in the system.
1. Access the View > Cost (PM025) menu.
2. Use the Search filters to find the desired cost and click on the Search button.
3. Select the cost in the list of records and click on the button to view its data screen.
Advanced search filters
Cost
- Cost: select the cost obtained in the execution of a process item.
- Value: enter the range of values to be searched. For example, list all costs between R$ 500.00 and R$ 1,000.00.
Activity/Process
- Activity/Process: select the activity or process that generated the cost to be viewed.
- Type: expand the list and check if the cost occurred in an activity, decision, or process. According to the selected option, fill in the Activity/decision/process type filter.
View Process X I/O matrix
Allows tracking materials and information transferred between the activities of a process.
1. Access the View > Process X I/O matrix (PM030) menu.
2. Use the Search filters to find the desired cost and click on the Search button.
3. Click on More and use the button to view the input & output diagram of the selected process.
Advanced search filters
General
Associate processes that will make up the matrix. To do this, use the buttons available in the filter:
 |
Allows selecting the desired processes. On the upper part of the screen that will open up, some search fields that allow retrieving records through specific information will be available. Hold the CTRL or SHIFT keys to select more than one option at a time. |
 |
Click on this button to dissociate a process from the analysis. |
View inter-process matrix
Allows viewing the relationship set among processes created in the system.
1. Access the View > Process X I/O matrix (PM030) menu.
2. Use the Search filters to find the desired cost and click on the Search button.
3. The  icon shows that there is a relationship. Hover the mouse over the icon to view the names of the two related processes. Click on the icon to open the screen with the relationship details. Note that, when hovering the mouse over the column titles, the name of the processes that each number represents is displayed:
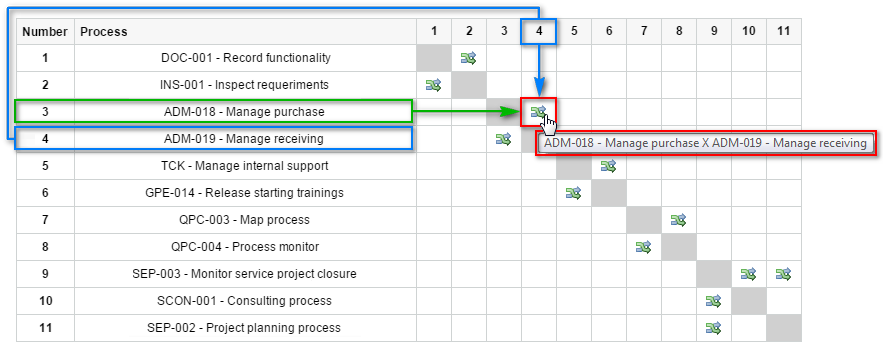
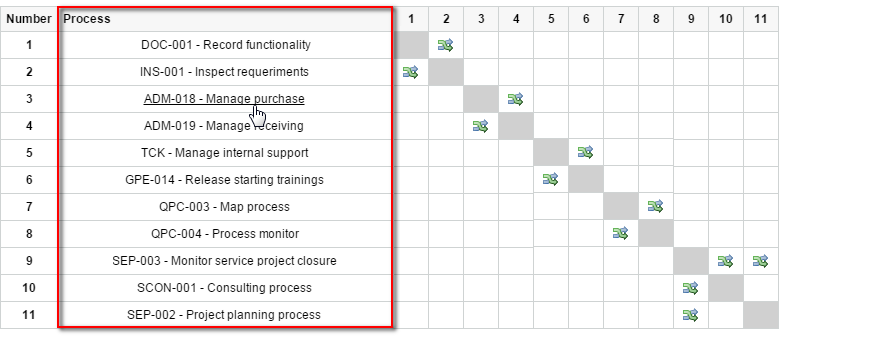
4. By clicking on the name of the process in the matrix, the system opens a screen displaying all the related processes. On this screen, it is possible to see which are the existing relationships with each process:
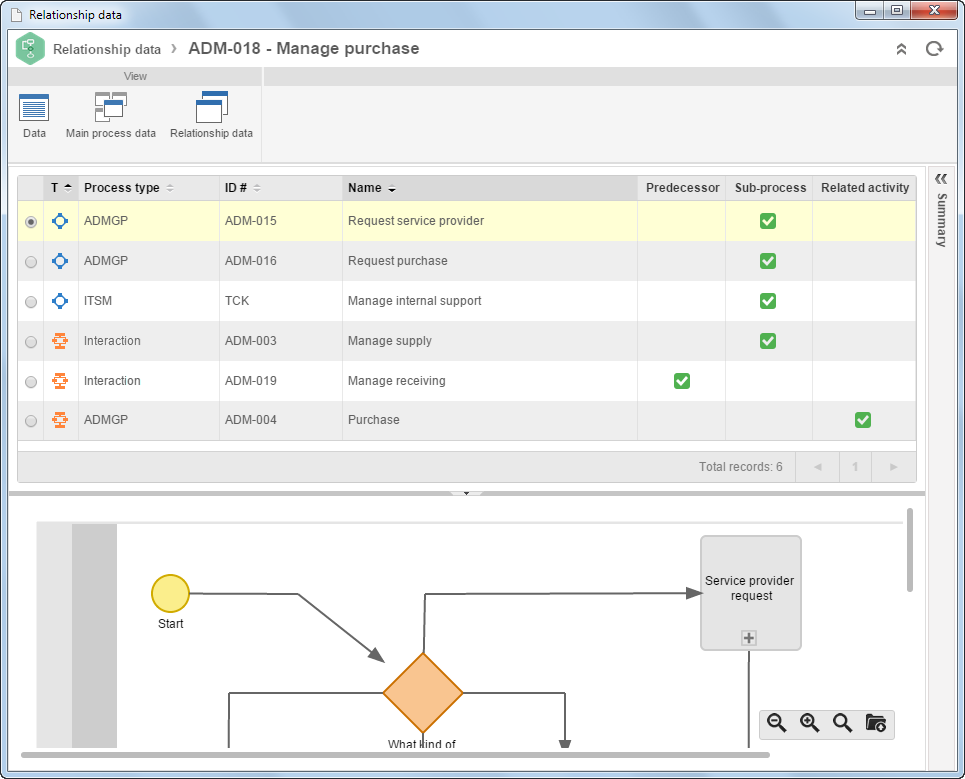
5. By clicking on the name of the process, on the data screen relationship, you can see a flowchart preview on the lower part of the screen. By clicking on the  icon in the Related activity column, on the lower part of the screen, you can see the common activities among the processes:
6. Click on More and use the  button to view the executor diagram configuration. The user selects in this screen the executors to display in the diagram. The diagram must display an executor (functional role), and then the activities of this role and the processes of each activity.
Advanced search filters
General
- ID #: enter the ID # of the process that is involved in the relationship and will be viewed.
- Name: enter the name of the process that is involved in the relationship and will be viewed.
- Status: expand the list of options and check the possible status in which the process involved in the relationship is found. If configured this way, some statuses will already be shown checked, but it will be possible to uncheck them. Use the other buttons to check all available statuses and clear all selections.
-
Record user: select the user who created the activity that will be viewed. Use the ,
 , and buttons to search for the intended user, select your own user, and clear the field respectively.
 -
Relationship type: select the relationship type that will be displayed in the matrix:
- Predecessor: this relationship displays the processes (sub-processes) that are connected by a transition.
- Sub-processes: displays the relationship between process and sub-process, that is, when the sub-process was inserted into the process' modeling.
- Activity: displays the existing relationship when multiple processes use the same activity.
- Show only related process: check this field so that the search result displays only the processes that have some type of relationship. Otherwise, all processes selected in the "Miscellaneous" section will be displayed, even if they do not have a relationship.
Executor
Select, in this section, the Executor type of the process that is involved in the relationship and that you wish to view.
The following types are available for selection: department, third-party entity, functional role, department/position or specific user. Remember that, according to the selected option, the respective search filter will be displayed for filling in the desired information.
Miscellaneous
Use this section to associate the processes that will make up the inter-process matrix.
To do this, use the buttons available in the filter. Remember that, if no process is selected in this section, all recorded processes in the system will be taken into consideration.
|
Allows selecting the desired processes. On the upper part of the screen that will open up, some search fields that allow retrieving records through specific information will be available. Hold the CTRL or SHIFT keys to select more than one option at a time. |
|
Click on this button to dissociate a process from the analysis. |
View resource
Allows for a detailed vision of the resources used in the execution of the activities, decisions, and processes recorded in the system.
1. Access the View > Resource (PM026) menu.
2. Use the Search filters to find the desired resource and click on the Search button.
3. Select the resource in the list of records and click on the button to open the data screen of process whose resource is selected on the main screen.
Advanced search filters
Resource
- Resource: enter the resource used in the execution of a process item.
- Resource type: select the type in which the resource used in the execution of the process item is classified.
- Quantity: enter the range that covers the quantity of resources used in the execution of the process item.
- Duration: enter the range that covers the number of hours worked by the resource in the execution of the process item.
- Hourly cost: enter the range that covers the resource's hourly cost.
Activity/Process
- Activity/Process: select the activity/process that used the resource.
- Type: select whether the resource was used in an activity, decision, or process. According to the selected option, fill in the Activity/decision/process type filter.
View revalidation
Allows viewing the revalidations made in the processes created in the system (that have this control configured), regardless of their current execution step.
1. Access the View > Revalidation (PM060) menu.
2. Use the Search filters to find the desired revalidation and click on the Search button.
3. Select the revalidation in the list of records and use one of the toolbar options:
 |
Click on this button to view the flowchart of the selected process. |
|
Click on this button to view the data screen of the selected process. |
Advanced search filters
Favorites
Select the Only favorites field so that only the records marked as favorites are displayed in the search results.
Process
- Sub-process: select the sub-process that composes the modeling of the process you wish to view.
- ID #: enter the number/code of the process you wish to view.
- Name: enter the name of the process you wish to view.
- Status: expand the list of options and check the possible status in which the process is found. If configured this way, some statuses will already be shown checked, but it will be possible to uncheck them. Use the other buttons to check all available statuses and clear all selections.
-
Responsible: select the user defined as responsible for the process that will be viewed. Use the , , and buttons to search for the intended user, select your own user, and clear the field respectively.
View revision
Allows tracking process revisions, regardless of their steps.
1. Access the View > Revision (PM027) menu.
2. Use the Search filters to find the desired revision and click on the Search button.
3. Select the revision in the list of records and use one of the toolbar options:
|
Click on this button to view the flowchart of the selected process. |
|
Click on this button to view the data screen of the selected process. |
4. Click on More and use one of the available options:
 |
Click on this button to compare the revisions of the selected process. |
 |
Click on this button to display the tree chart of the selected process. |
|
This button will be enabled when the type is enabled to integrate with SoftExpert Risk. By clicking on this button, the risk plan that uses the selected process as the scope is displayed. A risk plan can be created if it has not been recorded in SoftExpert Risk. |
Advanced search filters
Revision
- Reason: select the reason for which the revision was created.
- Status: expand the list of options and check the possible status in which the revision is found. If configured this way, some statuses will already be shown checked, but it will be possible to uncheck them. Use the other buttons to check all available statuses and clear all selections.
-
Show revisions: select which type of revision will be displayed.
- In progress: only the revisions that are in progress will be displayed in the search results.
- Current: only current revisions will be displayed in the search results.
- Obsolete: all obsolete revisions will be displayed in the search results.
- Revision date: enter the date range that covers the day of the revision or how many days ago the revision was carried out.
View tasks
Allows searching for and viewing activities created in SoftExpert Process.
1. Access the View > Tasks (PM028) menu.
2. Click on the Select task type field to select the tasks you wish to view.

3. Fill out the filters and click on the Search button. Tasks will be displayed below.
4. Enable the Display lower level records option so that the records found in the hierarchical levels below the selected type are also searched.
5. Select the desired tasks and click on Apply.
6. The search results will be displayed on the right side, according to the used filters.
For details about the operation of the view screens, click here.
Conclusion
Searches are a practical way of accessing system records, facilitating the management of information. See also how to view processes.