Editing table data
 |
 |
 |
 |
Prerequisites
- Access to the File > Table (FO014) menu.
- Previously created table.
Introduction
Tables provide data to create fields and relationships for forms.
Creating tables while building web forms and responsive forms is a good practice, but the system provides a specific menu for table creation and editing.
In this article, see how to create tables directly from the File > Table (FO014) menu and how to edit the data of tables previously added in the system.
Creating a table
1. Access the File > Table (FO014) menu.
2. Click on the  button.
3. Add an ID # and a name for the table.
4. Choose the table type that will classify the table being created.
5. Click on the Save button to enable the other configurations.
From version 2.1.0 onwards, the tables (formerly known as entities) are automatically released by the system.
Editing table data
1. Access the File > Table (FO014) menu.
2. Locate and select the table you wish to edit.
3. Click on the  button.
4. On the Table data screen, edit the desired fields:
General data tab
After saving the table for the first time, in the General data, it will be possible to change its name and description.
Moreover, the Allow handling of records through SE Form field is available in the general data. If it is enabled, the table record may have its data edited through the execution menu, that is, the table will be available on the Execution > Record by table (FO012) menu.

Field tab
This tab presents the fields that will store the information inserted in the forms of the table.
The toolbar, located on the right side of the screen, contains buttons that allow for adding new fields, editing or deleting existing ones, and changing the order in which the fields are shown on the list.
It is important to remember that the fields can be created from both this tab and the form designer.
To create a field directly from the table data screen, take the following steps:
1. In the Field tab, click on the button.
2. Add an ID # and a name for the field.
3. Choose the type of the information that will be recorded in the field.
4. Click on the  button.
In addition to the required fields, other options can be configured:
• Help text: insert the text that will be displayed when the mouse is placed next to the form associated with the field being created.
• Display in the list of records: enable this option so that the field is displayed in the lists of the Execution > Record, and View > Record menus.
• Maximum number of characters: if the selected type is Text, enter the maximum number of characters supported by the field.
• Default value: enter the default value of the field. This value will be shown in the form field.
• Limits: use this section if you wish to set a limit of values for the field. This section is shown only when the selected type is: Number, Long number, Decimal, or Date.
- Min. value: enter the lowest value the field may have. Values lower than the value set for this field cannot be inserted.
- Max. value: enter the highest value the field may have. Values greater than the value set for this field cannot be inserted.
• Size/Precision: fill in this field to specify how many decimal places will appear after the point. This section accepts values between 1 and 8 and will only be available if the selected type is Decimal.
For example:
If precision is 2, the number of decimal places after the point will be 2. If it is 3, the number of places after the point will be 3, and so on.
Precision |
Number |
| 2 | 10.56 |
| 3 | 10.567 |
• Do not allow adding duplicated information to the grid: check this option to prevent the duplication of information already inserted in the form grid in the same process instance.
• Do not allow adding duplicated information to the grid (Except for null values): check this option to prevent the duplication of information already inserted in the form grid, except for null values.
• Thousandth separator: check this option so that the numbers inserted in the field are formatted with the thousandth separator. This option is available only if the selected type is Number or Long number.
• The ID # and the type of the fields cannot be changed after the table is saved.
• When the order of the fields is changed in the table data by means of the  and
and  buttons, the same sorting is applied both in the Record tab and in the Execution > Record by table (FO012) menu. Remember that, for the fields to be displayed in these locations, it is necessary that the Display in the list of records option is enabled.
Form tab
This tab displays the forms associated with the table.
See which operations can be performed using the buttons available on the toolbar located on the right side of the tab:
|
• Form: allows for creating a web form and associating it with the table being edited. • Responsive form: allows for creating a responsive form and associating it with the table being edited. |
|
• Form editor: allows for accessing the form editor to change the design of the selected form or responsive form. • Form data: allows for editing the data of the selected form. |
 |
Allows for deleting the selected form. |
Relationship tab
This tab displays the relationships of the table.
Table relationships allow for creating a relationship between two tables in the database, aiming at creating a list of values.
As an example, we have the relationship between "Order" and "Customer". In an order form, there may be a field with a list of customers, from which a customer is selected. Then, in the order table, a relationship is created with customers.
Relationships can be created from the Relationship tab of the table or from the form.
To create a relationship through the tab, take the following steps:
1. Click on the side toolbar button.
2. Add an ID # and a name for the relationship.
3. Select the destination table, that is, the table that contains the records and that will be related to the field of the form referring to the table we are editing. In this field, it is possible to search for an existing table or use the  button to create a new one.
4. Enable the Display in the list of records field if you wish for the destination table fields to be available on the Execution > Record and View > Record menus.
5. Click on the button.
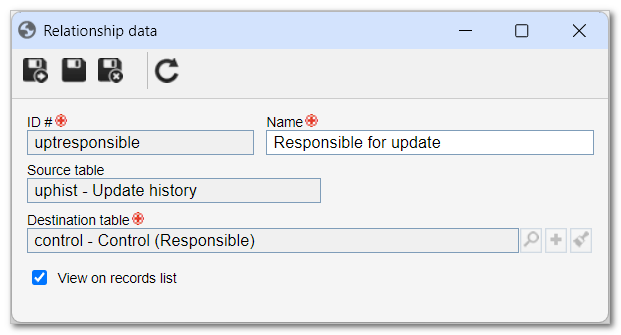
On the right side of the screen, we also find the buttons that allow for editing data () and deleting () a relationship.
Once the relationship is saved, only its name and the configuration for displaying it in the list of records can be changed.
Related tab
This tab shows the relationships in which the table being edited has been related, that is, the relationships in which the table has been inserted as a destination table.
Record tab
This tab displays the records linked to the forms associated with the table.
Through it, it is possible to view all data already saved, as well as add new records, edit existing information, or delete records that are no longer necessary. It is also possible to change the status (active/inactive) of every record.
To add a record, click on the button, from the sidebar toolbar.
If the table has more than one associated form, after clicking on the button, it is necessary to choose in which form the record will be included.
Revision
In this tab, the revision control of the forms belonging to the table can be enabled. Revisions allow for controlling and keeping a history of changes made to forms.
In the Revision process field, define whether the form revisions will occur through the ISO9000 based, Workflow, or Simplified process.
For more information on how to configure form revisions, refer to the What is a revision? article.
The revision process cannot be changed after a form is associated with the table.
Security
This tab allows for configuring the security of the table, as well as of the forms and records related to it.
Upon creating the table, the system automatically considers that the security of the table type will be replicated in the tab, but it is possible to configure specific controls for the table. To this end, the Inherit security list from table type field must be unchecked.
After unchecking this option, we must use the Security control definition field to choose whether we will configure the security of the table, of the forms, or of the related records. Then, simply click on the button to add the desired permissions.
The Record user field is automatically filled in by the system with the user who created the table, but it can be changed.
To learn how security works and how to configure permission controls, access the How does the permission profile work? article.
Translation
This tab makes it possible to configure a translation API in order for pivot tables to be automatically translated, including the fields and relationships of the table, from the default language.
The system automatically adds the English and Spanish languages. By clicking on the Translate automatically button, it is possible to choose between machine translation for all items, or only for those that have not yet been translated.
To add other languages into which you want to translate the fields, simply click on the  button, select the desired language, and click on Apply.

It is possible to manually edit the translation suggestions provided by the API.
For this resource to be available, SoftExpert Copilot must be acquired and the SoftExpert cloud platform must be used. Check further details about the configuration of translation APIs by clicking here.
5. Upon finishing all necessary changes on the table data screen, click on the Save and exit button.
Conclusion
All done! By following all the presented steps, you will be able to create and edit tables without any issues.