Creating a status
Prerequisite
- Access to the File > Automation > Status (PM044) menu.
Introduction
The system allows associating statuses to objects of processes with automation, as well as automatically changing the status when the process instance is closed.
Statuses can be used in different scenarios. In the context of SLA, for example, they can indicate whether the service is paused, in progress, or completed. In the context of the entire process, they can represent in which macro step the flow is.
In an order placement process, for example, it is possible to associate statuses with the activities. In this way, a flow of statuses is created, as exemplified in the image below, which represents the evolution of the process throughout its steps, with each of them potentially containing various activities or sub-processes.
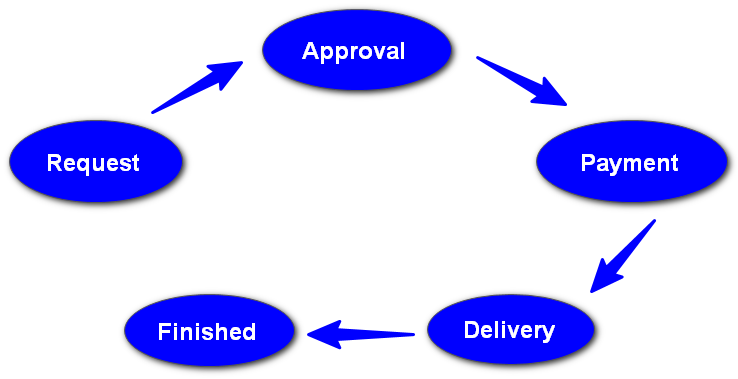
This allows the user to clearly monitor the status of the process.
Furthermore, it is possible to define a status for the closure of the process, facilitating the analysis of the results. In a salary raise request process, for example, it is possible to configure that, if the raise is approved, the process is closed with the "Approved" status and, if denied, with the "Rejected" status.
This allows identifying how many workflows were approved or rejected, without the need to access each instance individually.
See below how to create statuses:
Creating a status
1. Access the File > Automation > Status (PM044) menu.
2. Click on the  button.
3. Enter the ID # and name of the status.
4. In the General tab, select the component of the status that is being configured.
5. Select one of the available objects for the component selected in the previous field.
6. Select one of the available operations for the object selected in the previous field.
7. Choose the icon that will represent the status. Use the  button to search for the desired icon.
8. Click on the  button.
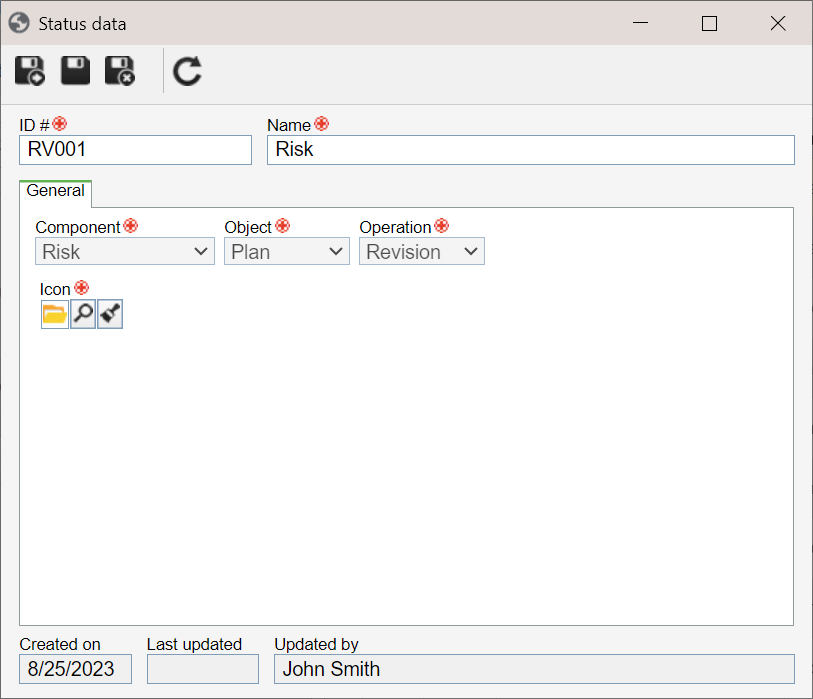
9. After saving, use the Control tab to select the controls that will be available for the status:
| Component | Object | Operation | Control |
| APQP/PPAP | APQP/PPAP | Revision | Edit data: if this option is selected, during the revision, the user can edit APQP/PPAP data. |
| Asset | Asset | Revision | Edit data: if this option is selected, during the revision, the user can edit asset data. |
| Audit | Audit | Audit project |
Edit auditor and audited object: if this option is checked, it will be possible to edit the auditor and the audited object during the execution of an audit project activity. Edit requirement structure: if this option is checked, it will be possible to edit the requirement structure during the execution of an audit project activity. Evaluate working paper: if this option is checked, it will be possible to evaluate the working paper during the execution of an audit project activity. Enter audit result: if this option is checked, it will be possible to enter audit results during the execution of an audit project activity. |
| Knowledge base | Article | Revision | No control options. |
| Performance | Scorecard | Revision | No control options. |
| Document | Document | Revision |
Edit electronic file: if this option is checked, during the revision, it will be possible to edit an electronic file. Comment: if this option is checked, during the revision, it will be possible to add comments to a document. Edit metadata: if this option is checked, during the revision, it will be possible to change a document's metadata. Require electronic file: if this option is checked, to execute the revision, the system will require that the document have an electronic file. Require viewing the electronic file: if this option is checked, to execute the revision, the system will require that the electronic file be viewed. Allow adding document to the process: if this option is checked, it will be possible to add other documents to the revision process. Watermark status: select the watermark that will be displayed in the electronic file of the document that is being revised. |
| Document | Document | Approval | No control options. |
| Document | Capture batch | Verification | No control options. |
| FMEA | FMEA | Revision |
Edit data: if this option is checked, during the revision, it will be possible to edit FMEA data. Edit structure: if this option is checked, during the revision, it will be possible to edit the FMEA structure. |
| Form | Form | Revision |
Edit data: if this option is checked, during the revision, it will be possible to edit form data. Edit drawing: if this option is checked, during the revision, it will be possible to edit the modeling of a form. |
| Supply | Supply | Revision | Edit data: if this option is checked, during the revision, it will be possible to edit supply data. |
| PDM | Item | Revision |
Edit data: if this option is checked, during the revision, it will be possible to edit item data. Edit drawing: if this option is checked, during the revision, it will be possible to edit the electronic file of an item. |
| Process | Process | Revision | Edit process: if this option is checked, during the revision, it will be possible to edit a process flowchart. |
| Survey | Survey | Revision |
Edit data: if this option is checked, during the revision, it will be possible to edit survey template data. Edit drawing: if this option is checked, during the revision, it will be possible to edit survey template questions. |
| Requirement | Requirement | Revision | No control options. |
| Requirement | Requirement mapping | Revision | No control options. |
| Risk | Risk | Revision | No control options. |
| Training | Course | Revision | Edit data: if this option is checked, during the revision, it will be possible to edit course data. |
| Workflow | Workflow | Instance | No control options. |
| Workflow | Incident | Instance | No control options. |
| Workflow | Problem | Instance | No control options. |
10. Click on the  button.
Conclusion
The created statuses are ready to be associated with the process activities.