Editing the activity data during execution
 |
 |
 |
 |
Prerequisites
- Started workflow.
- Access to the My tasks > Workflow > Activity execution menu.
Introduction
When executing an instance activity, it is possible to perform several changes on the activity data screen.
To learn how to start the activity execution and access its data screen, refer to the Executing a workflow activity article.
See how the execution screen is divided and the data that can be edited:
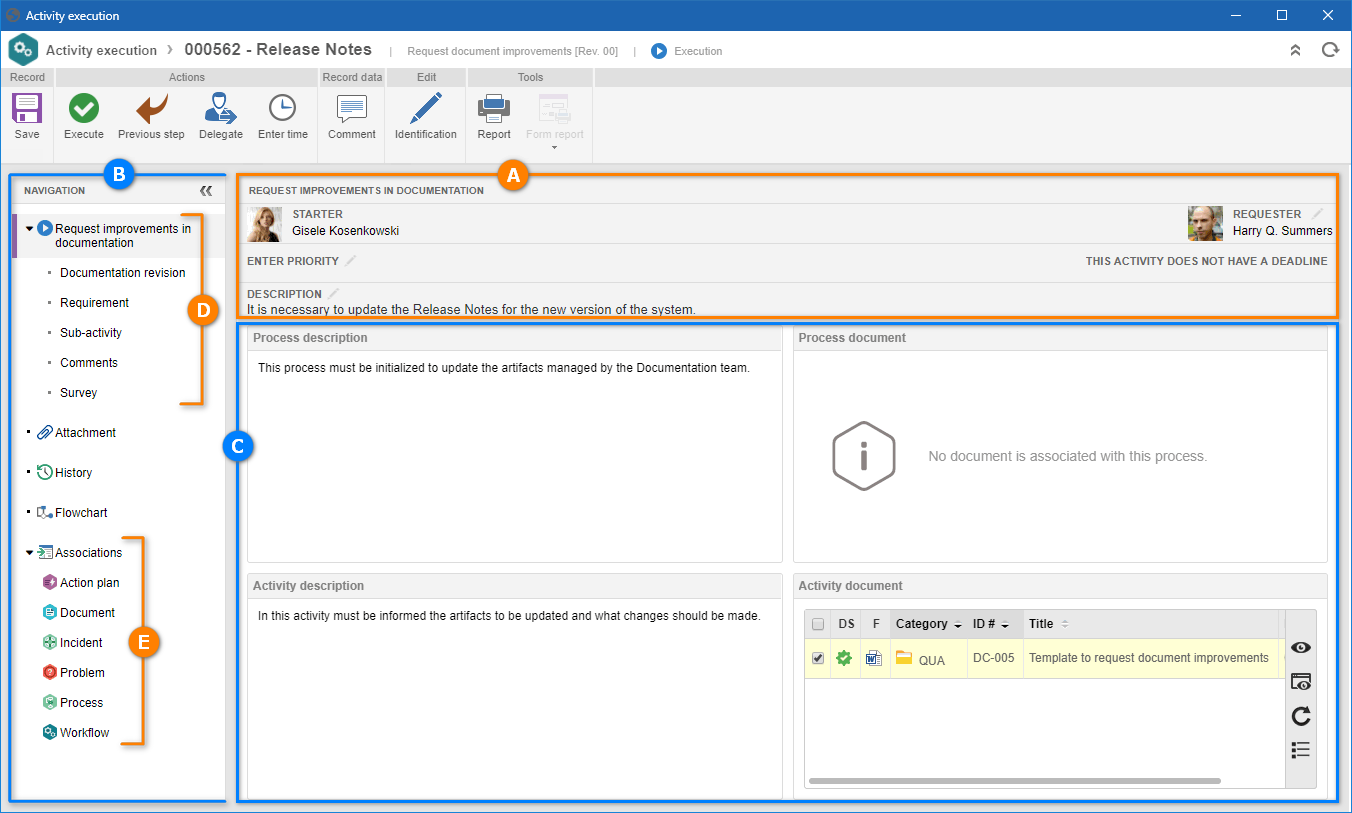
A — This area displays information about the execution of the activity, such as starter, requester, priority, deadline, and description.
B — The Navigation panel allows you to access the various sections that may be configured in the activity. This panel will not be displayed if, in the activity data (Configurations > Form), the Show form only in activity execution option has been checked.
C — This area displays information regarding the tab selected in the Navigation panel.
D — This area displays some sections that were configured for the activity during process modeling. They may be available in the activity to fill out the forms, attributes, requirements, checklist, and sub-activities, among others.
E — This area will display the associations that can be carried out in the activity. The displayed associations depend on the configuration performed in the activity (Configurations > Association) and the availability of the component in the license key.
The image above is for illustrative purposes only and aims to exemplify the sections and fields that may be displayed on the execution screen and on the Navigation panel. The information will vary according to the configurations made during process creation and modeling.
Activity data
Information on the execution of the activity
In the panel on the highlighted area (A), the information about the activity execution is available. The following information/configurations are available:
- Starter: this field displays the name and photo of the user who started the process. Click on the workflow starter name or picture to which the activity belongs to view their data.
- Requester: this option allows entering the requester of the activity.
- Enter priority: this option allows indicating the activity priority.
- Activity deadline: this option shows whether the activity has a deadline and, if so, whether it is on time or past due.
-
Description: if the description has been entered when starting the workflow, it will be displayed in this field. Otherwise, click on the
 button to enter or edit the description of the workflow.
• For the executor to be able to enter or edit the requester and the priority, the Allow editing requester and Allow priority editing options must have been checked in the activity configurations (Configurations > Instance) during process modeling.
• For further details on entering a requester, entering a priority, and editing the activity deadline, refer to the Managing workflows article.
• The deadline of an activity is defined by filling out the Duration field of the activity data screen, during process modeling. The system calculates the deadline based on the default calendar used by the process. Learn how to edit the activity deadlines.
• For the executor to be able to enter or edit the description, the Enable description change option must have been checked in the configuration of the activity (Configurations > Instance) that is under execution.
Activity details
By selecting the "upper level" item of the area corresponding to the activity data (D), the descriptions and documents of the workflow process and the respective activity under execution will be displayed:
Process description: displays the description entered in the process data. This description may, for example, contain information about the use of the process in the organization.
Activity description: displays the description entered in the activity data during the process modeling. This description may, for example, contain information about what should be done during the execution of the activity, or what is expected to be achieved with the activity execution.
Process document: displays the documents associated with the process data (Documentation > Document). These documents can be used as normative documents, that is, they can be used as templates for possible searches. To do that, use the buttons on the side toolbar of each field to view the electronic file or the document data.
Activity document: displays the documents associated with the activity data (Documentation > Document). These documents can be used as normative documents, that is, they can be used as templates for possible searches. To do that, use the buttons on the side toolbar of each field to view the electronic file or the document data.
In the Configuration > General parameters (WF019) menu, it is possible to parameterize options related to document association. By checking the Allow the executor to disassociate documents associated by a different user on the activity execution screen option, the executor user for the workflow activity will be able to disassociate documents that were associated by other users.
Fill in form
The forms section will only be displayed if a form is associated in the activity data (Configuration > Form). Therefore, if the activity has been configured with a form, the first item displayed in section B corresponds to the activity form.
By default, when there is an associated form, it will be selected by the system and may be enabled for completion or just for viewing, according to the configuration performed at the time of its association with the activity. If the Show form only in activity execution option is checked in the activity, then, the activity execution is only summarized by completing the form, that is, there will be no attributes or checklists to be filled out during the activity execution.
In the case of a process with some automation, a new button will be displayed in the toolbar (Ribbon) to allow for associating the required object, such as "Revision document".
When it is enabled, the form completion will vary according to the modeling of the form. Therefore, fill out all required fields ( ).
).
Depending on the configurations set in the activity action during process modeling, the form will only be saved successfully if it follows the configured rule.
Attribute
The Attribute section will only be displayed if one or more attributes are associated with the activity data (Configuration > Attribute). Therefore, enter the value of the attributes that complement the activity.
Those that are required must have their values filled out. Blocked attributes will be filled out by the system with the default value defined during the association with the activity of the process that is being executed. Remember that the procedure to fill out an attribute varies according to the configurations established when the attribute is created (SoftExpert Process).
For further information on attributes and their completion, click here.
In the Configuration > General parameters (WF019) menu, it is possible to check the Copy values of the employee profile attributes to the instance option for the values of the attributes in the employee profile to be copied to the process instance. To do that, the attributes that must be filled out in the instance must be associated with the process and the employee profile. If no values are filled out in the profile attribute, no values will be copied to the instance.
Checklist
The Checklist section will only be displayed if a checklist is associated with the activity data (Configuration > Checklist).
This section will display a list of questions that will help the responsible party to execute the activity properly.
For further information on checklist configuration and completion, click here.
Requirements
The Requirement section will only be displayed if a requirement is associated with the activity data (Configuration > Requirement).
This section presents the requirements configured for the activity, with which documents or attachments may be associated, according to the configuration defined during its creation. To do that, fill out the fields of the Attachment/Document column.
It is important to point out that, upon clicking on the  button, only the attachments and documents that were previously associated with the activity will be available for selection. Use the other buttons in this column if it is necessary to add a new document/attachment, view, or clear the selected document/attachment.
Sub-activity
The Sub-activity section will only be displayed if, in the activity data (Configurations > Instance), the Allow creating sub-activities option has been checked.
In this section, the user can add complementary activities to be performed during the execution of the workflow. In addition to the workflow sub-activity, the system allows creating or associating SoftExpert Kanban tasks, as long as it is part of the solutions acquired by the organization.
The following buttons will be available:
All activities: allows filtering the previously associated kanban tasks or process activities, or displaying all activities.
Associate: allows associating tasks previously created in SoftExpert Kanban. After clicking on the button, select the desired activities and click on the Save & close button.
Create: select one of the available options and fill out the corresponding information:
- Activity: allows creating a process activity.
- Kanban task: allows creating a Kanban task.
If you wish to dissociate an activity or task, click on the  button on the upper corner of the card.
Check the Wait for sub-activities execution so that current activity can be executed option to define that sub-activities must be performed before the process activity that is under execution.
• The sub-activity should be executed in a way that is similar to the process activity, that is, it will be displayed in the list of pending records on the execution menu. After filling out the required fields on the data screen, click on the Execute button of the Actions section.
• The sub-activity will not be displayed in the process flowchart; it will only be identified through an icon in the element that represents the activity of the process to which it belongs.
File form
The File form section will only be displayed if a file form is associated with the activity data (Configuration > File form).
This section displays the file forms that were associated with the activity during process modeling. In order to do it, use the buttons on the side toolbar as necessary:
 |
Click on this button to view and/or edit the electronic file of the form selected in the list of records. Remember that it will only be possible to edit the file if the Read-only column is not checked in the activity data screen during process modeling. |
 |
After viewing the electronic file and performing the necessary changes, click on this button to release it. Select the desired record before clicking on this button. |
 |
Click on this button to view the data screen of the file form selected in the list of records. |
To-do tasks
The Task section will only be displayed if a task is associated with the activity data (Configuration > Task).
This section presents the tasks that must be performed during the activity execution. To indicate that a task has been executed, click on the side toolbar button and fill out the following fields on the screen that will open:
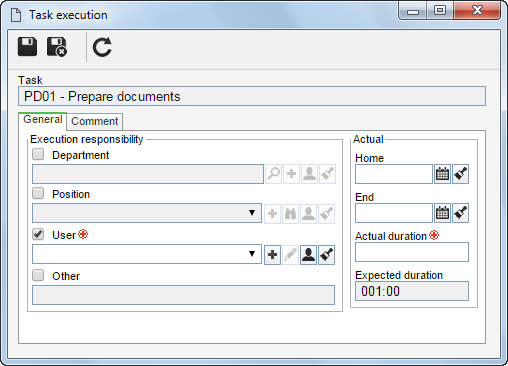
The Task field is filled out by the system with the name of the task under execution.
On the General tab, the following fields related to activity execution are available:
Responsible for the execution: check the corresponding option and fill out the fields that will be enabled:
- Department: select the department whose users are responsible for the execution of the task.
- Position: select the position of the users who are responsible for the execution of the task.
- Department/Position: select, in the respective fields, the department and position of the users responsible for the execution of the task.
- User: select the user who is responsible for the execution of the task.
- Other: enter the party responsible for the execution of the task.
Actual: enter, in the following fields, the task percentage that has been executed:
- Start: this field is filled out with the current date, but it can be edited. In this case, select the date when the task execution started.
- End: select the end date for task execution.
- Actual duration: enter the actual time of task execution.
- Expected duration: this field is filled out with the estimated time for task execution, defined in SoftExpert Process.
Use the Comment tab to enter relevant information about the execution of the task.
After filling out the fields, click on  .
.
Revision object
The Revision object section will only be displayed if the workflow refers to object revision. The name of this section varies according to the object being revised. For example: Revision document, revision item, revision asset, etc.
This section displays the objects that are undergoing revision via workflow. Use the buttons on the side toolbar to perform the necessary operations. Note that the available buttons vary according to the object type and the revision status. See the specific documentation of the component to which the object that is being revised belongs for more information.
Comments
In the Comments section, information regarding the execution of the activity should be entered. Filling out this field is mandatory if the activity executor wishes to delegate the activity to another user or return the flow to the execution of the activity before the current activity.
This field may also be mandatory if the action to be performed is configured with the mandatory completion of the Comments item.
Survey
The Survey section will be displayed if a survey template is associated with the activity data (Configurations > Survey).
In this section, the survey that was created from the template associated with the workflow process will be displayed. The survey can be answered through both the activity execution screen and the Answer survey task of SoftExpert Survey.
Refer to the specific documentation of the Survey component for further details about answering a survey.
If there is a responsible team defined in the survey template, the survey displayed in the activity can only be answered by the members of this team, that is, the survey will not be enabled for completion for the executor of the workflow activity.
Attachment
Use the Attachment section to add attachments related to the activity that is being executed. The Attachment section may be displayed in the activity Form if the attachment container is modelled in the form. Otherwise, this section will be displayed in the Navigation panel.
In the upper part of this section, it is possible to select the following options:
| All levels | Displays, in the list of records, the attachments added during the execution of an activity of any workflow level. |
| Current instance | Displays, in the list of records, the attachments added during the execution of all the workflow activities. |
| Activity under execution | Displays, in the list of records, only the attachments added during the execution of the activity. |
• If the activity has multiple executors, an attachment may only be edited/deleted by the user who added it and only during the execution of the activity.
• If the activity does NOT have multiple executors, an attachment may be edited/deleted during the execution of the activity, regardless of who added it.
For further details on associating attachments, click here.
History
Through the History section, located in the Navigation panel, it is possible to view the main events that occurred during the workflow execution up to the current date. By checking the Show all history option, all events that occurred until the current date will be displayed in detail.
In the Configuration > General parameters (WF019) menu, in the Record in workflow history field, it is possible to define in detail which events will be added to the history of a workflow. The history detail level can be:
- Summarized history: only the most important workflow events will be displayed in the history.
- Full history (Consumes more space in the database): all events performed in the workflow will be displayed in the history. This option is more detailed, but it consumes more space in the database.
- Customized history: by selecting this option, the user can check the desired events in the History event configurations section of the general parameters.
To add a comment, click on the Comment button displayed below each event that occurred in the instance. It is also possible to add comments by clicking on the Comment button in the instance button panel.
On the screen that will be displayed, record the desired comment. The added comment will be displayed in the timeline or hierarchically below the commented event. It is possible to edit the comment or delete it through the Edit and Delete buttons in the comment event.
• If the activity has multiple executors, a comment may only be edited/deleted by the user who added it and only during the execution of the activity.
• If the activity does NOT have multiple executors, a comment may be edited/deleted during the execution of the activity, regardless of who added it.
• The system adds an event to the history when a comment is edited/deleted.
• Upon adding a comment during the execution, an e-mail notification may be triggered if the process is duly configured. For further details, access the Configuring notifications in the process article.
Flowchart
Through the Flowchart section, it is possible to view the flowchart of the instantiated process, which enables tracking the execution point of the activity.
Hover the mouse over the flowchart elements (activities, sub-process, decision, etc.) to view their data (status, start date, executor, etc.).
Refer to the Process component documentation for more information on process flowcharts.
Security
If the Enable starter to edit instance viewing permissions option is checked in the process security data, the Security tab will be displayed to the process starter.
Through this tab, during the execution of any activity under the responsibility of the starter, they can define the users who may or may not view the instance. To do so, the following buttons must be used:
 |
Click on this button to add a new view permission to the workflow. It is important to note that the starter can only assign the View control to the new access control. |
|
Click on this button to edit one of the view permissions of the workflow. |
 |
Click on this button to delete one of the view permissions from the workflow. Select the desired record before clicking on this button. |
Conclusion
Thus, the activity data will be configured.
For further information on the associations with items from other system components, refer to the Associating items with the activity data section.