Signing a document via ClickSign
Prerequisites
- Document from a category associated with a signature configuration.
- User that belongs to the document security list configured in the Security > Document tab of the category, with the "Sign" control enabled.
- ClickSign account.
- Access to the File > Document (DC003) menu.
Introduction
Electronic signatures are different from digital signatures as they require integration between external platforms and SoftExpert Document. The initial procedure, however, is basically the same as the digital signature.
To sign the electronic files of a document, it must have an electronic signature configuration associated with its category.
See below the steps to electronically sign a document via ClickSign:
Signing a document
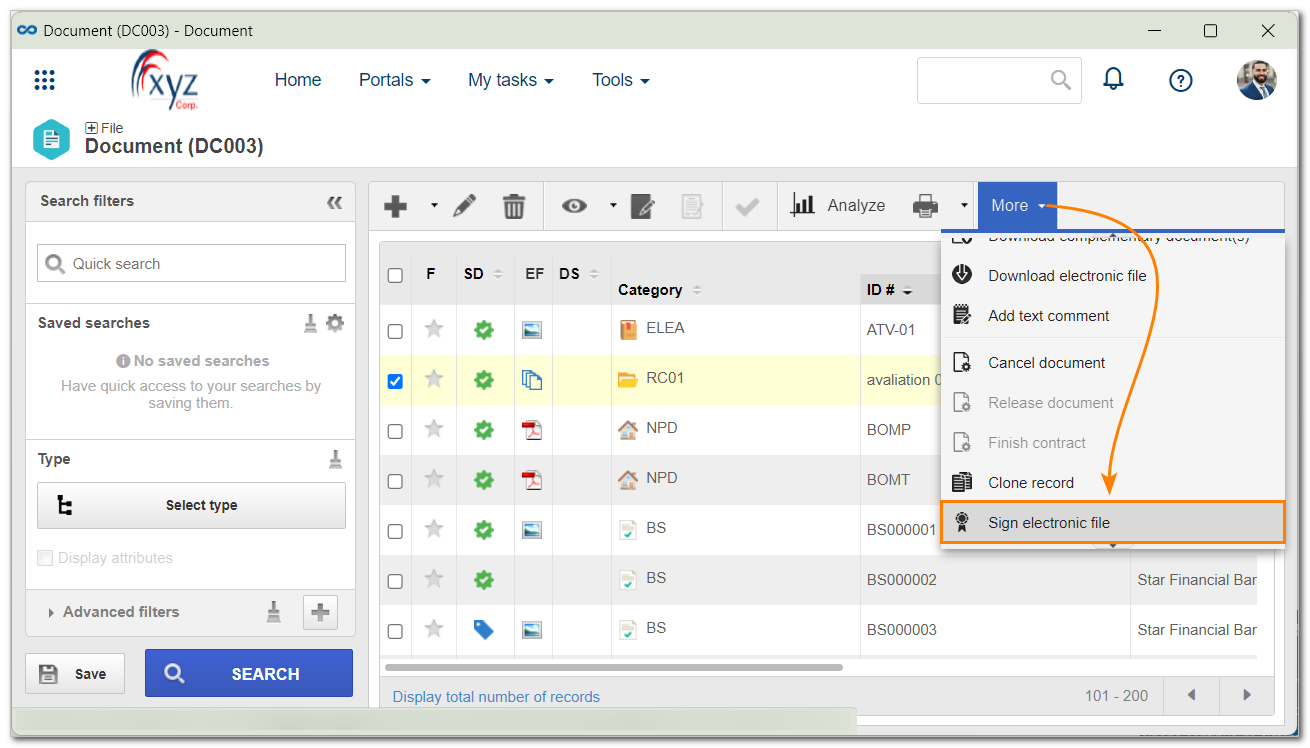
1. Access the File > Document (DC003) menu.
2. Select a document in the list of records on the main screen.
3. On the toolbar, expand the "More" button and click on Sign electronic file.

If the document selected for signature has multiple electronic files, before step 4, a screen will be displayed to confirm the selection of the files you wish to sign.
4. A screen will be opened to fill out the fields below:
| Document language | Select the language in which the signatory notification e-mail will be sent. |
| Define the sending order | Check this option to define an order to sign the file. Thus, ClickSign will notify the signatories in a numeric order until all of them sign it. |
| Name | Enter the name of the signatory. |
| Enter the e-mail of the signatory. | |
| Does the signer have a Brazilian SSN? |
Yes: Enter the Brazilian SSN and the birth date of the signatory so that they are displayed in the signature. No: The Brazilian SSN and the birth date of the signatory will not be displayed in the signature. |
| Sign as | Click on the option that corresponds to the way the signatory will sign the document. Use the Add new signer option at the bottom of the screen to add a new signatory. |
5. Once the fields are filled out, click on Next.
6. Then, enter the subject and the message text that will be sent to the signatories.
7. Click on Send. The document will be sent to ClickSign, which will notify the signatories of the need to sign it.
After signing the document, click on the green icon in the DS column to view the data of the signature in the electronic file on the list of records on the main screen.
Through the DS column, it is also possible to view the electronic file signature status. Hover the mouse pointer over the icon to identify what it represents.
Conclusion
The electronic signature of the document via ClickSign has been finished. Thus, it is possible to ensure greater integrity and authenticity in your documents.


