Form designer overview
 |
 |
 |
 |
Prerequisites
- Access to the File > Form (FO005) menu.
- Previously created web form.
Introduction
SoftExpert Form provides a screen with all the tools necessary for creating and designing a form.
Its editor allows for adding fields easily, in addition to enabling a smart alignment among the components and having the zoom feature to make it easier to view the designing area.
Watch the video to understand how the form designer screen is divided:
Toolbar

Record
| Save | Saves the changes made to the form. |
| Save and exit | Saves the changes made to the form and closes the editor. |
Actions
| Display form | Allows for previewing the form in execution mode, that is, in completion mode. |
| Evaluate form | A screen will open to let the user know whether the form has any errors. For example: components inserted in the form without table fields associated. |
| Queries | A screen will open to allow the user to configure queries for database searches and updates, with the possibility of using commands in the formulas. |
According to the revision template configured in the form table, the Enable editing, Accept revision, and Delete revision buttons will be displayed. Check the article Revising forms for further details.
Edit
| Delete | All components selected in the designing area will be removed. |
| Move |
Click on the arrow located below this button to display the displacement options:
|
| Select all | Selects all components inserted in the designing area. |
Sort
| Align |
Click on the arrow located below this button to view the item alignment options:
|
| Dynamic alignment | Enables dynamic alignment; in other words, if this feature is enabled, when the item is dragged in the designing area, the system will show a line once it is horizontally or vertically aligned with another form item. |
View
| Data | Allows for viewing the data of the form. |
Tools
| Import from table | Components that correspond to the fields created in the form table will be added. Such fields will be automatically included in the form design area. If the table has no fields added, no changes will be made to the form. |
| Save as image | This option allows for saving the form as an image so that the user can see clearly how the form fields are designed. |
| Rules |
Click on the arrow located below this button to see the available rule options:
|
| Mobile | The system will display a screen that will allow for defining which form fields will be presented in the mobile completion version, available when the form is being used in a process automated for SoftExpert Workflow. See further details in the Running a mobile simulation article. |
Items panel
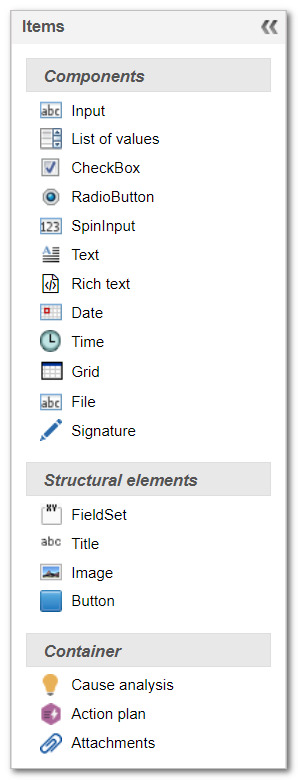
Components
| Input | Allows for inputting data of the text, number, and decimal types. |
| List of values | Allows for selecting a value by means of a selection list or a search. |
| Checkbox | Allows for checking/unchecking an option. |
| Radio button | Allows for checking an option among multiple ones (other radio buttons). |
| SpinInput | Allows for inputting data of the number type. |
| Text | Allows for inputting text. |
| Rich text | Allows for inputting rich text, that is, formatting the text (setting or changing font type, size and color, applying the bold, italics, and underline styles), formatting paragraphs, and inserting tables, links, and images. |
| Date | Allows for inputting data of the date type. |
| Time | Allows for inputting data of the time type. |
| Grid | Allows for associating multiple records, such as items of an order. |
| File | Allows for adding a file. |
| Signature | Allows for adding the user's signature. |
The system allows compacting the form files stored in a controlled directory. To this end, in the Configuration > System (CM006) menu of SoftExpert Configuration, the Compressed saving mode must be selected in the Files added to the forms section.
Check further details about the configuration in the article Configuring file storage .
Structural elements
| FieldSet | The FieldSet is shown with all of its area highlighted. Use this exhibition component to separate form fields into areas. |
| Title | Allows for adding a title to the form, a text to a field, or a general message. |
| Image | Allows for inserting an image in the form. |
| Button | Allows for inserting a button in the form. |
General data
| Form revision | This component shows the revision date of the form. It will be displayed only if the form table is configured with revision control. |
Container
| Cause analysis | If the Cause analysis container is enabled, this option will be shown on the form data screen. This component allows for performing a cause analysis when the form is associated with a process activity automated for SoftExpert Workflow. Note: the process activity must be configured for the cause analysis step. |
| Action plan | If the Action plan container is enabled, this option will be shown on the form data screen. This component allows for viewing or adding/editing action plans when the form is associated with a process activity automated for SoftExpert Workflow. Note: the process activity must be configured for association or viewing of action plans. |
| Attachment | Allows for adding or viewing attachments directly from the form associated with a process activity automated for SoftExpert Workflow. |
Conclusion
Now that you know the structure of the designer, learn how to design a form.