Starting a workflow as an external user
Prerequisites
- Access to the external user registration menu (AD060) in SoftExpert Administration or the File > Customer (CT001) menu in SoftExpert Customer.
- Registered external user.
- External user access configured.
- Process and process activities duly configured.
- Customer panel and widgets configured.
Introduction
An external user can create selected workflows, incidents, and problems in SoftExpert Workflow. During the operation, it is possible to fill out form fields, execute activities, view the instance history, and enter comments.
To do so, the access to the system by the external user has been centered in the Customer portal. For the external user to use the portal, it must be configured with the workflow, incident, and problem start and tracking widgets through the Customer panel menu in SoftExpert Configuration.
Moreover, since the access to the system by the external user is separate from corporate users, it must be enabled in the system configurations (CM008 menu), and external users must be registered as customer contacts to maintain the relationship with the companies. Thus, it is possible to use the external users as requesters in an instance, for example.
See below further details on the external user and how to configure all necessary parameters for them to start workflows.
External user restrictions
- External users cannot be associated with functional roles, departments, positions, or teams, as they are not part of the corporate structure. They are linked in the contact section of the company data in SoftExpert Customer.
- The external user will only be the executor of an activity if they are the instance requester or starter, and the activity is configured for it.
- They cannot edit the requester user nor create or view private comments.
- The activity execution screen for an external user displays only the form. It is not possible to access the flowchart, activity assignment, security, and other associations.
Configuring the external user access
To allow external users to access the system, request the system administrator or, if you have access to the CM008 menu of SoftExpert Configuration, access the External user access section and check the Allow external users access to the system option.
This section will also display the URL that the external users will use to access the system.
Registering an external user
It is possible to register an external user through the SoftExpert Administration and SoftExpert Customer. See how the registration works in both cases:
To register an external user in SoftExpert Administration:
1. Access the external user registration menu (AD060).
2. Expand the  button and select one of the following options:
- Add user: if this option is selected, the screen to add the external user will be displayed for the completion of the external user data.
- Add from a contact: if this option is selected, a screen to select a contact previously created for a company will be displayed. After locating the desired contact, select it and save it. At this point, the screen to add an external user will be displayed with some of the data already filled out based on the selected contact.
3. In both cases, in the external user addition screen, fill out the external user data and save the record.
If you do not have access to the AD060 menu, request the system administrator to add the external users.
In SoftExpert Customer, the external user is created as the contact of a customer. To do so:
1. Access the File > Customer (CT001) menu.
2. Select the customer who will have the external user as a contact.
3. On the company data screen, access the Contact section.
4. Then, expand the button and select the Add as external user option.
5. At this point, the screen to add the external user will be displayed.
6. Fill out the external user data and save the record.
To log in, the external user must use an E-mail and a Password; therefore, entering a valid e-mail address is of the utmost importance.
The Company field may be filled out if the user is being added through the company data, but it is important to point out that after saving the record, this field can no longer be edited.
Configuring a process and process activities
For a process to be started by an external user, some configurations must be performed in the process and in the activity that will be executed by the external user:
- To display the process in the customer panel, the process security must be public.
- The process must be configured to allow entering requesters of the Customer type. In the process data, access the Configurations > Instance section and, in the Enter requester field, check "Customers".
- For an activity to be executed by the external user, it is necessary to define the requester as the activity executor. To do so, on the activity data screen, click on Configurations > Execution. In this tab, when the executor type is defined in the instance, it will be possible to check the "Requester" option, defining the requester as the activity executor. If the lane in which the activity is modeled cannot be configured to set the executor in the instance, it is possible to check the "Consider dynamic executor" option and set the requester as executor through the DEFINE_EXECUTOR('Requester';'';'')
- The activity that will be executed by the external user must have a nonresponsive form associated, as all data that must be filled out by an external user must be in a form. Due to the restrictions that external users have in the Suite, the form will be the only way to fill out information or add attachments to the process. Thus, to facilitate process modeling, check the Show form only in activity execution option available in the Configurations > Form section in the data of the activity that will be executed by the external user.
- Only the attachment container is compatible with the external user. The other containers will not be displayed.
- The responsive form will not be displayed to the external user.
Configuring the customer panel
After logging in, the external user will have access to the operations that are available in the workflow, incident, and problem start and tracking widgets in the Customer panel.
Before accessing the widgets, they must have been configured in SoftExpert Configuration through the Configuration > Customer panel menu. If you do not have access to this menu, request the system administrator to configure the widgets.
See below the widgets that must be configured to be available to be used by the external user:
- Activity tracking: lists the enabled activities of instances in which the external user is the starter or requester and allows the external user to execute activities that are assigned to them (starter or requester). This widget does not require any configurations.
- Start workflows: allows the external user to start the workflows. This widget requires the processes that may be started by the external users to be configured, which may be displayed as a list or as a grid.
After performing all the necessary configurations, see how an external user can start a workflow:
Starting a workflow as an external user
1. As an external user, access the system with the URL made available when configuring your access.
2. On the screen that will be displayed, log in with the E-mail and Password configured during your registration.
3. The customer panel will be displayed.
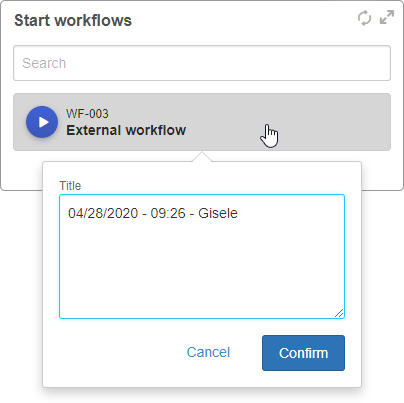
4. In the workflow start widget (which may have a customized title), locate the process you wish to start.
5. When hovering the mouse over the card icon, it becomes a "Play" button. Click on it to start the workflow.
6. If the permission to edit the instance title is configured, the identification screen will be displayed. In this case, if desired, edit the instance title and confirm:
7. After confirming the start of the workflow, the workflow activity execution screen will be displayed if its execution is set for the instance starter.
See below how to execute an activity:
Executing an activity as an external user
There are two operations that can execute an activity:
Upon starting a workflow through the start widget described in the previous topic, after performing step 7.
In the activity tracking widget, when certain workflow activity is enabled for the external user. In this case, in the tracking widget, the "play" button will be displayed in the activity card (A) to execute it.
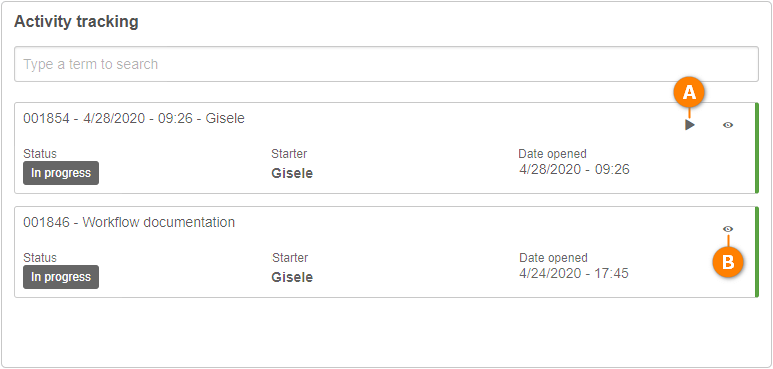
The tracking widget also has the view button (B) to access the instance data. Thus, it is possible to view the history and enter comments.
After accessing the activity execution screen, in either case, perform the following steps:
1. On the activity execution screen, it is necessary to fill out the form. The form displayed by default will vary according to its modeling.
2. The upper toolbar on the screen displays some options. Perform the desired operations:
- Comment: clicking on this button will open a screen to add comments to the instance. Comments written by the external user can be accessed by any (internal) user with permission in the instance. It is not possible to record private comments. If you wish to edit or delete the comment, simply access the instance history.
- Identification: this button will only be displayed if the activity under execution is configured in process modeling with the Enable ID # change option and/or the Enable title change option. Thus, if necessary, click on this button and perform the desired changes.
- History: clicking on this button will open a screen with the instance history and comments. Comments made by the external users can be edited or deleted. Check the Show all history option to display secondary interactions, such as adding attachments, etc.
- Form report: clicking on this button will display the report options. The form may be exported to: PDF, Image, or HTML.
3. After performing the desired operations, fill out the form fields.
4. If necessary, associate attachments.
5. Click on Save.
6. Then, click on the Execute button.
Conclusion
Thus, you have successfully started a workflow and executed the workflow activity!