Creating an ISO9000-based revision
Prerequisites
- Access to the File > Revision menu.
- Access to the Management > Revision menu.
- The revision control must be properly configured in the category of the document. See further details in the Create a document with revision control article.
- The logged user must have the "Revise" control allowed in document security. See further details in the Apply document security article.
- The latest revision of the document must be closed.
Introduction
After configuring the ISO9000-based revision, it is possible to apply it to the desired component.
The revision record can be applied to several components within the organization, such as internal processes, projects, services, and products. Thus, it ensures the expectations of the responsible parties are met.
To show an example of this feature, we will use SoftExpert Document.
Creating a document revision
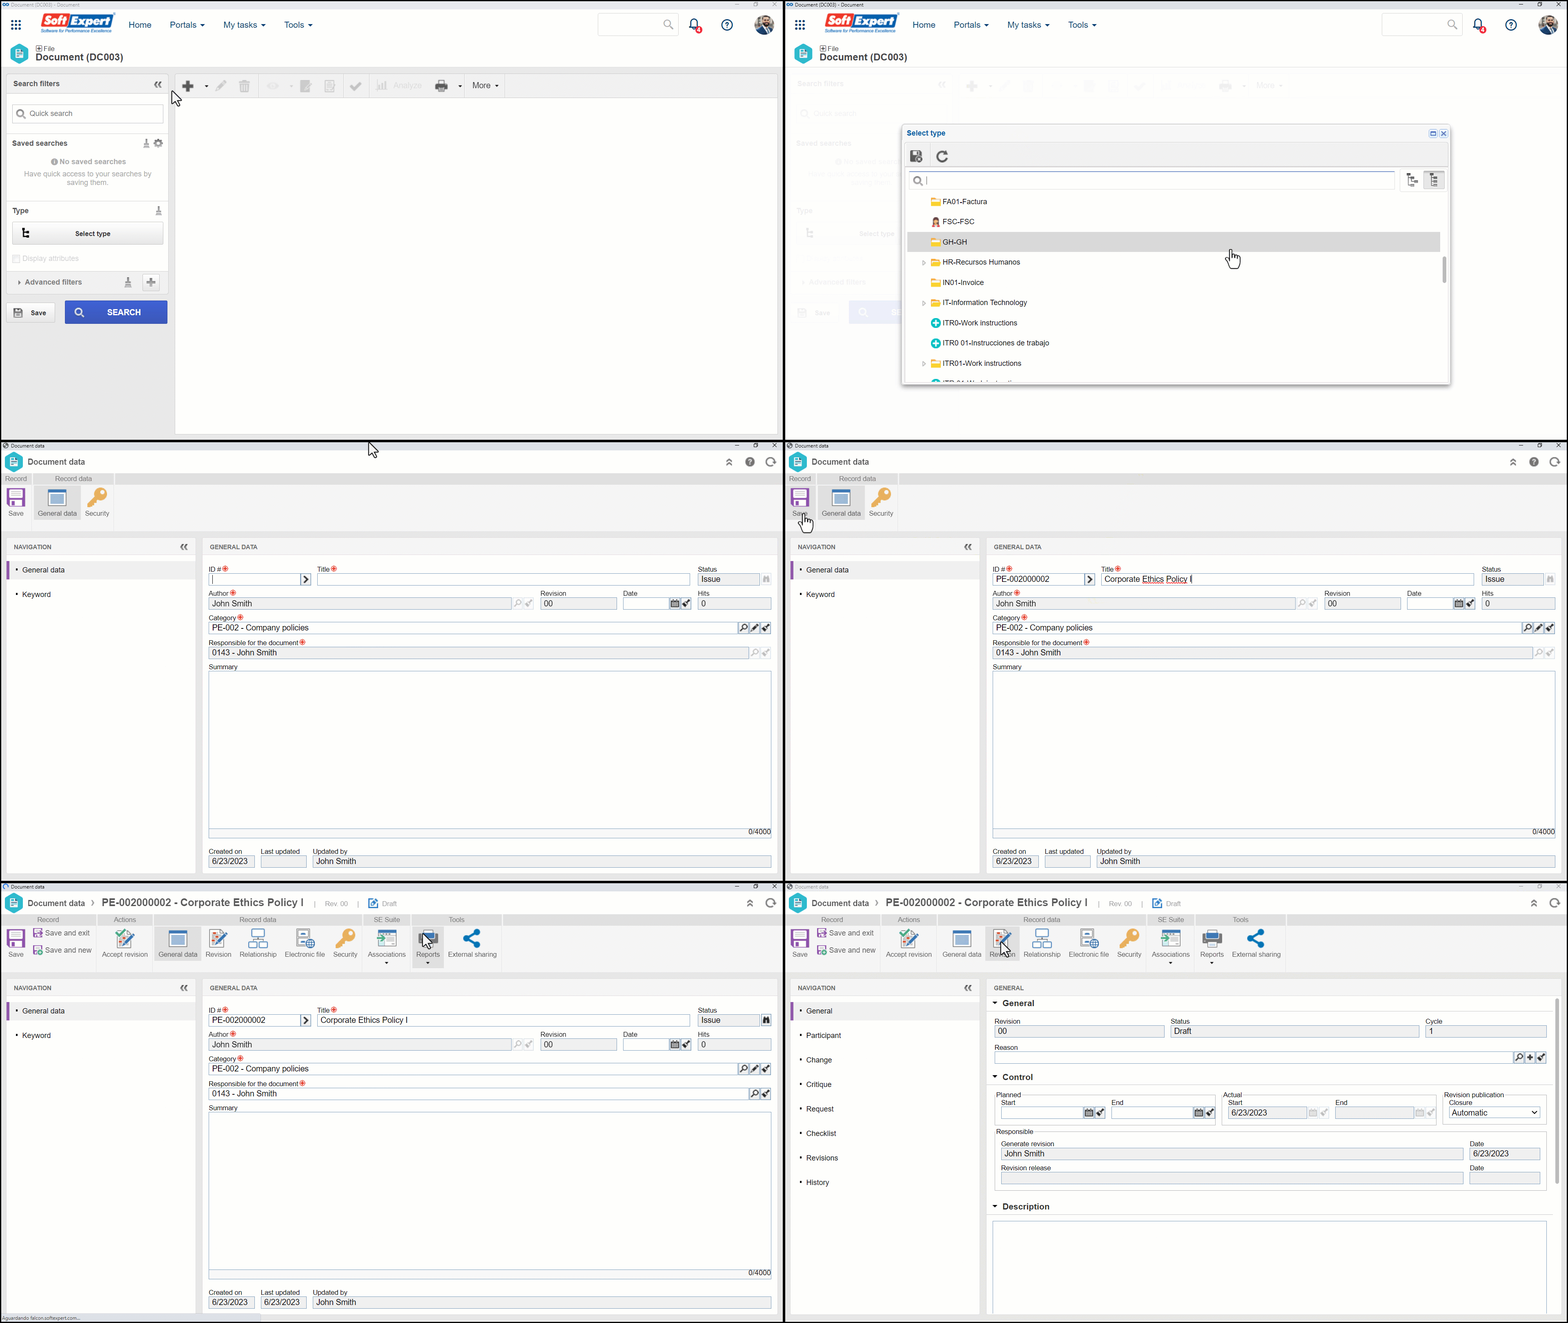
1. Access the File > Document menu and click on the  button.
2. On the screen that will be opened, select the category configured in the Configuring an ISO9000-based revision article.
3. Fill out the ID # and Title fields of the document. For this example, keep the ID # created by the system and add the title of "Corporate Ethics Policy".
4. Click on the Save button and accept the system request to create a new revision.

5. Lastly, it is possible to adjust some configurations in the Revision tab as desired.
6. After doing that, click on the  button.
Complementary resources
See further details regarding each field available for the revision:
General
In this section, it is possible to enter the Reason for which the revision was created. Reasons available for selection were created through the Configuration > Revision > Reason menu. If you wish to add a new reason, click on the Add button and, on the screen that will be opened, enter an ID # and a name for the revision reason. It is also possible to enter a description.

The Add button will only be displayed if you have access to the aforementioned menu.
This section also displays some information on the revision in progress, such as revision ID #, status or step, date, and cycle.
The revision ID # field can be edited in any step if it is configured as "Customized".
In the Control section, it is possible to define the dates scheduled for the start and end of the revision. The actual start and end dates are filled out by the system. This section also displays the user responsible for creating the revision. The user responsible for releasing the revision will be automatically filled out once the revision ends.
Then, use the Description field to add additional comments regarding the revision.
Use the Explanation field to highlight the need for the revision. If it has been configured, filling out this field may be mandatory.
Participant
The completion depends on the route type selected in the category.
If the route is:
- Fixed & unique: this subsection may not be edited.
- Fixed: participants can only be selected through the "Import route" button at the bottom part of this subsection.
- Variable: participants may be selected through a route or through the buttons in the bottom part of this subsection.
For fixed routes, at the bottom of the screen, click on the  button to import the participant flow from a previously created revision route. On the screen that will be opened, locate and select the route and save the selection.
In case a revision route has not been entered, add the desired revision route participants at the bottom of the screen. Simply click on the  button to add a participant.
1. It will be mandatory to fill out this field if the "Require explanation to be filled out when revision is started" option is checked in the revision control configuration.
2. Regardless of the route type, it will not be possible to add, edit, or remove participants from steps that have already been executed.
Change
Use it to enter the changes that were performed in the document. They may be added both by the user creating the revision and by the drafters through the draft step in the "Document revision" task.
Critique
According to the current step of the revision, the following changes will be available:
-
Review, Approval, Release, or Closure: the executor of the revision may add critiques concerning the revision. To do this, click on the
 button and, in the "Critique" tab of the screen that will be opened, fill out the desired critique.
 -
Draft: in the second cycle or later, the drafter should enter, in this tab, the solutions for each critique entered. To do this, click on the
 button and, in the "Solution" tab of the screen that will be opened, fill out the desired solution.
Checklist
This section will only be displayed if the user who is accessing the screen is also the user responsible for the execution of the current revision step.
The list of questions allows assisting the responsible party in the execution of the revision step. In order to answer them, select the desired option: Yes, No, or N/A.
The answers may have already been selected by the system according to the standard defined when creating the checklist. Moreover, filling out the Comments fields may be mandatory or not, also according to the configurations established when creating the checklist.
Revisions
This section displays a listing of all revisions that the document has gone or will go through. Use the  button to view the data of the document revision selected in the listing.
History
Allows viewing the history of users who added comments to the document. Text comments can be also viewed through the Security > Comments section of the document data screen to which the electronic files belong.
Conclusion
Upon finishing the creation of the ISO9000-based revision, it will go to the Execution step, which may have the same user who created it or other users, according to the configurations set in the Participant tab.


