SoftExpert Suite widgets
 |
 |
 |
 |
 |
Prerequisites
- Access to the Portals > Create menu.
- Permission to edit in the portal.
Introduction
This article will display an overview of the default SoftExpert Suite widgets.
In addition to the widgets covered by this article, there are others, which are specific to each system component.
Their detailed description is in the corresponding categories of the components, available in the Help center.
Adding SoftExpert Suite widgets
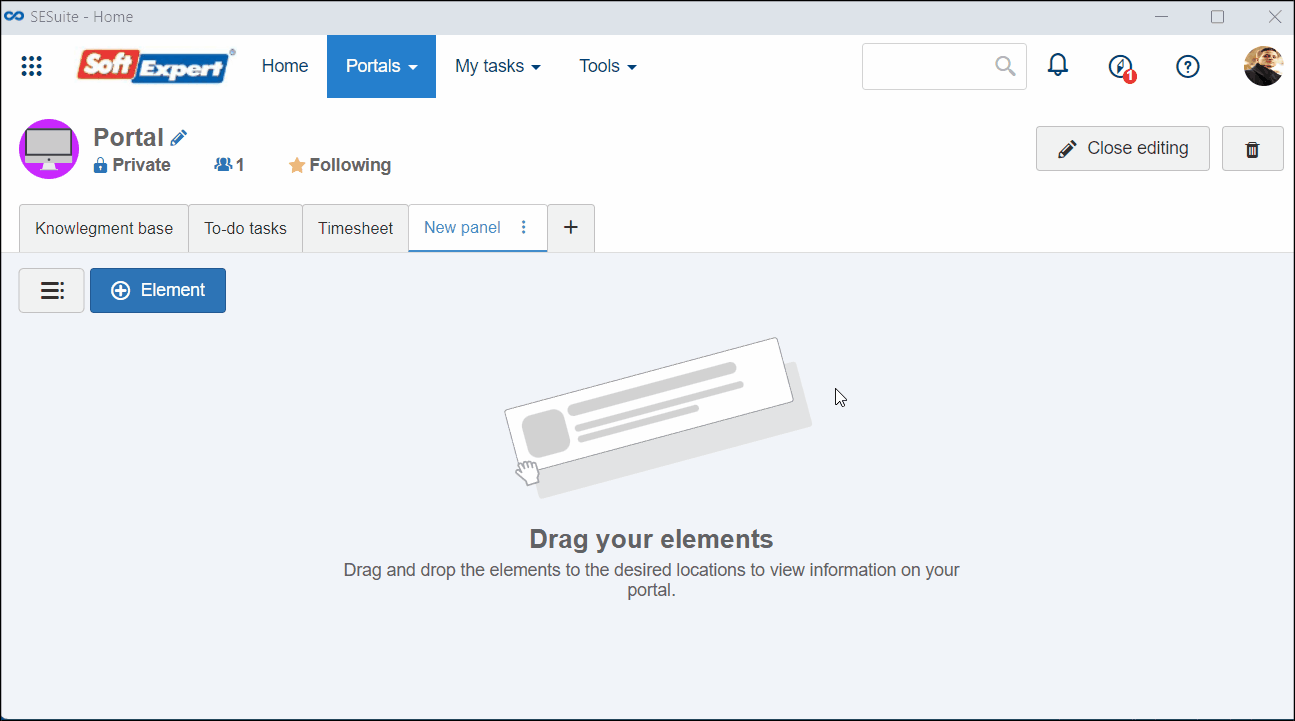
1. Once the portal is on edit mode, click on the tab to which you wish to add the widget.
2. Click on the Element button and select the Add widget option.
3. Select the SE Suite option. At this point, all default system widgets will be displayed:
Last accessed
This widget lists the last pages the user has accessed in the system. No configuration is required to use it in a portal.
Birthdays
This widget lists the system users whose birthdays are celebrated that week or that month. When dragging this element to the portal, it will be necessary to configure which employees will be displayed by clicking on the configuration link available in the widget. On the configuration panel, define a title and configure the following options:
| Display birthdays |
|
| Filter by |
|
- On the birthday of the logged user, the following message will be displayed: "Today is your day, happy birthday!".
- The birth date of the user must be correctly filled out in the Employee profile screen, located in "Administration > Management > Employee profile (AD006).
My team activities
This widget is suitable for leaders to track the tasks of their teams. By dragging this element to the portal, it will be necessary to configure which tasks will be listed and how to view them:
| Which tasks will be displayed? | |
| Tasks of all SE Suite | All tasks (from any component) of your subordinates will be displayed. |
| Tasks of a specific component | The tasks of your subordinates from certain components will be displayed. As soon as this option is checked, a field will be displayed, allowing the selection of one or more components. |
| How will tasks be viewed? | Option checked | Option unchecked |
| Open in a new tab | After accessing the task list of one of your subordinates, by clicking on one of the tasks, a new tab will be opened, displaying the "View tasks" screen of the user. | By clicking on one of the tasks of that user, the tab through which the system is being accessed will be reloaded, displaying their "View tasks" screen. |
| Display inactive users | Inactive users, that is, employees who are no longer part of the organization, will be listed in this widget. | The widget will display only employees who are active in the system and under your leadership. |
It displays an organized structure to provide a clear vision of the tasks assigned to your subordinates.
The first column displays the list of employees under your leadership, and the other columns display, for each user, the number of tasks in different statuses.
By selecting a task assigned to a specific user in the portal, the widget will be automatically updates to display the tasks of this specific user.
To return to the vision of the employee list, simply click on the "Back" button. This feature facilitates browsing and managing tasks efficiently within the platform.

This widget aims to filter the tasks displayed by subordinate. This element is not associated with the e-mail task notifications, as the notifications display only the tasks in progress.
Notepad
This widget displays informative notes in the portal. When dragging a notepad to the portal, it will be necessary to enter a title for the note and its content.
Full-text search
This widget displays a field in the portal that allows for performing a system-wide search. By dragging this element to the portal, it will be necessary to configure whether the search will be performed in all system components or a specific component.
If the search is configured to be performed in a specific component, the widget will display the component name in its title.
Service catalog
This widget aims to unify the main SoftExpert Suite resources for users to easily start workflows and request previously configured services within a few clicks.
The service catalog aims to be a gateway for basic and advanced users, making demand management more effective. It will allow services from several components to be gathered and grouped in a single, clean interface through the portal widgets.
For further details, refer to the Service catalog article.
Saved searches
This widget allows listing the searches saved in the system. When dragging this element to the portal, it will be necessary to configure it by clicking on the available configuration link.
On the configuration panel, define a title for the widget and configure which saved searches will be displayed:
- All: By checking this option, no additional configurations will be necessary. This option allows displaying all saved searches, as long as they have been saved as public; otherwise, only the author of the search can access it.
- Per component: By checking this option, it will be necessary to select the components that have the saved searches that will be listed in the widget. This option allows displaying only the searches from certain components, as long as they have been saved as public; otherwise, only the author of the search can access it.
- Specific: By checking this option, it will be necessary to select, in the respective field, the specific searches that will be listed in the widget. This option allows displaying only the selected searches, as long as they have been saved as public; otherwise, only the author of the search can access it.
- My searches: By checking this option, no additional configurations will be necessary. This option allows displaying all saved searches performed by the logged user.
- Public: By checking this option, no additional configurations will be necessary. This option allows displaying all searches saved in public mode.
- Private searches can only be accessed by their authors. For a saved search to be accessed by any portal user, make sure to share it as Public.
- If the widget is configured with the "All", "Per component", "Specific", and "Public" options, the saved searches in components to which the logged user does not have access permission will not be displayed.
Favorites
This widget lists your favorite records.
By dragging this element to the portal, it will be necessary to configure which favorite records will be displayed: from all components or from a specific component.
If the displayed favorites belong to a specific component, the widget will display the component name on its title.
Menu options
This widget allows for listing certain system menus. When dragging this element to the portal, it will be necessary to configure it by clicking on the available configuration link. On the configuration panel, define a title and configure the display format and the menus:
- Display in the format of: Select whether the menus will be displayed as a grid or a list.
- Open in a new tab: Check this option so that the menus of this widget are displayed in a new tab. If this option is unchecked, when accessing a menu of this widget, the portal screen will be reloaded, and the menu will be displayed.
- Screen: Use the menu name or code to locate it. As soon as the menu is selected, click on "Add". At this point, a new "Screen" field will be displayed, allowing the user to add new menus to the widget. Repeat this procedure until all desired menus are configured in the widget.
When configuring the menus, use the menu code to facilitate locating the desired menu.
Kanban
This widget lists the activities of certain components by using the Kanban method.
To use this element in a portal, it will be necessary to define a title for the widget, the control period, and the components whose activities will be displayed in the Kanban. It will also be possible to configure which users must be displayed in the panel.
To see activities from all users, check the I wish to see the activities of all users in the panel option.
External links
This widget displays external links as cards. When dragging this element to the portal, it will be necessary to configure it by clicking on the available configuration link. On the configuration panel, define a title for the widget and configure the display format and the URL of each link:
- Display in the format of: Select whether the links will be displayed as a grid or a list.
- Title/URL: Enter a title for the link and its URL next to it. As soon as the fields are filled out, click on Add. At this point, a new line will be displayed with the Title and URL fields, allowing the user to add new links to the widget. Repeat this procedure until all desired links are configured in the widget.
Portal list
This widget allows for listing certain system portals. When dragging this element to the portal, it will be necessary to configure it by clicking on the available configuration link. On the configuration panel, define a title for the widget and configure the display format and the portals/tabs to be displayed:
Display in the format of: Select whether the portals will be displayed as a grid or a list.
Portal/Tab: Select the portal and the respective tab that will be displayed in the widget. When accessing the portal through the widget, the element will be displayed in the configured tab. As soon as the fields are filled out, click on Add. At this point, a new line will be displayed with the Portal and Tab fields, allowing the user to add new portals to the widget. Repeat this procedure until all desired portals are configured in the widget.
Stage gate
This widget graphically displays the life cycle of certain system records. In order to use this widget, it will be necessary to create a name for it, to define the lanes in the matrix, and to map the status of the objects to be displayed in each lane. It is possible to define the audit (SoftExpert Audit) and item revision (SoftExpert PDM) statuses.
To add new lanes, click on the Add lane button. Define the name to be displayed in each lane. If it is necessary to delete a lane, use the Delete option below the title field of the lane to be deleted.
My tasks
This widget lists your tasks. By dragging this element to the portal, it will be necessary to configure which tasks will be listed and how to view them:
| Which tasks will be displayed? | |
| Tasks of all SE Suite | If this option is selected, all of your tasks (from any component) will be displayed. |
| Tasks of a specific component | If this option is selected, the tasks from certain components will be displayed. As soon as this option is checked, a field will be displayed, allowing the selection of one or more components. |
| How will tasks be viewed? | Option checked | Option unchecked |
| Open in a new tab | By clicking on one of the tasks, a new tab will be opened, displaying the execution or tracking screen of the accessed task. | By clicking on one of the tasks, the tab through which the system is being accessed will be reloaded to display the execution or tracking screen for the selected task. |
This widget allows displaying the execution or tracking tasks of a certain status (past due, close to due date or on time).
Web page
This widget allows displaying the content of a web page directly in the portal. By dragging this element to the portal, it will be necessary to configure a title for it, as well as the URL (that uses the HTTPS protocol) and the number of minutes for the system to reload (update) the page.
4. After configuring the widget, click on Save to register the changes.
Conclusion
After adding and configuring widgets, it is possible to parameterize the other portal resources.