Validating sample information
Prerequisite
- Access to the Configuration > General parameters (SP019) menu.
Introduction
Validations aid in correctly filling out sample information, avoiding errors such as incorrect values, uncalibrated gages, or missing sample characteristics. Each scenario will have its own specific validation configuration.
See below some information validation examples.
Validating sample information in different scenarios
Non-conforming measurements
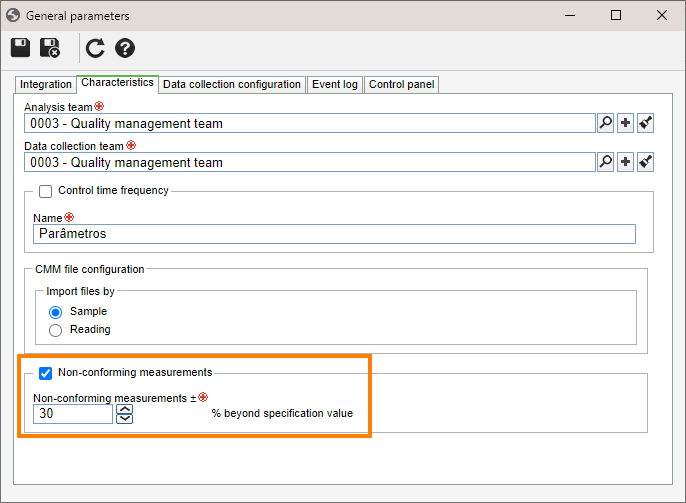
To ensure the entered readings are within acceptable limits, a control of X% is applied to the specifications.
For example, if the Lower limit is 215.00 and the Upper limit is 245.00, and the non-conforming measurements are 10%, the user cannot enter values higher than 269.5 (245.00 + 10%) or lower than 212.85 (215.00 - 10%).
To configure this validation, execute the following steps:
1. Access the Configuration > General parameters (SP019) menu.
2. Access the Characteristics tab.
3. Check the Non-conforming measurements option and define the acceptable percentage that users can enter.

This configuration will allow the system to prevent the addition of values beyond the specified limits, ensuring the integrity of sample information.
Enabling the omission of a characteristic in the sample
By default, the system does not allow users to leave blank characteristics when filling out a sample.
It is necessary to enter all characteristics to create a new sample. However, it is possible to change this behavior and allow creating samples without the need to fill out all characteristics.
To perform this configuration, execute the following steps:
1. Access the Configuration > General parameters (SP019) menu.
2. Access the Characteristics tab.
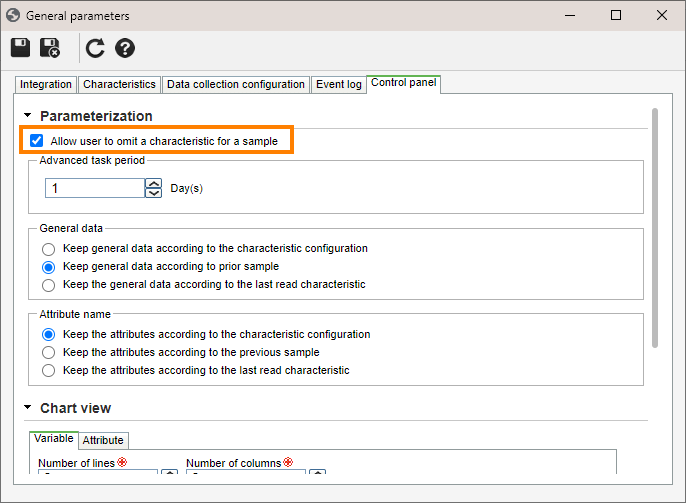
3. On the Control panel tab, check the Allow user to omit a characteristic for a sample option.

By enabling this option, the system will allow the user to create samples without the need to fill out all characteristics, providing greater flexibility in the sample creation process.
Enabling the use of calibrated assets only
This validation during the collection execution lists only the assets (machines and gages) that meet certain criteria, such as having been revised, having an up-to-date maintenance plan, or having the "In usage" status.
To configure this validation, execute the following steps:
1. Access the Configuration > General parameters (SP019) menu.
2. Access the Integration tab.
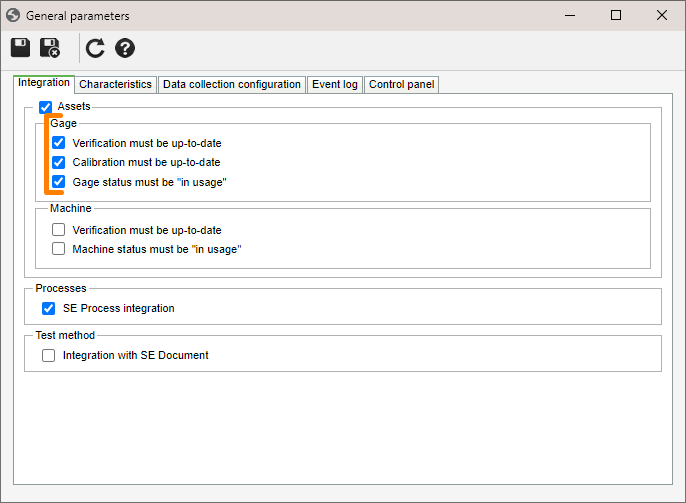
3. In the section related to the machine or gage, select the option according to the specific needs.
- Verification must be up-to-date: Only assets with up-to-date revisions will be listed. Assets without a released revision will not be listed.
- Calibration must be up-to-date: Only assets with up-to-date maintenance plans from SoftExpert Maintenance will be listed.
- Gage status must be "in usage": Only assets under the "In usage" status will be listed.

Upon configuring these options, only the assets that meet the defined criteria will be displayed during the collection execution, providing more precise control over the assets available for selection.
Switching shifts
During the collection execution, when a work shift is entered, the system checks whether the collection time is within the period that corresponds to the provided shift.
If there are inconsistencies, the system will display an alert message to notify the user on the possible discrepancy between the sample time and the entered shift. This helps ensure the precision and consistency of the records, alerting about possible errors in the association between work shift and collection time.
Conclusion
This article has taught you about information validation. Thus, system validations reduce errors in the completion of collection sample data, ensuring more precise and reliable information.


