Executing the capture steps
 |
 |
 |
 |
Prerequisites
- Access to the Execution > Capture (CAP006) menu.
- Previously recorded capture configuration.
- Access to the My tasks > Capture menu.
Introduction
After starting the capture process, it is necessary to execute its steps before the document batches are made available in SoftExpert Document.
See further details about the execution of each step:
Executing the capture steps
Creating a batch
The creation of the batches takes place in the Execution > Capture (CAP006) menu. The system allows the capture batches to be created manually, as displayed in the video of the Executing the capture article.
Batches can also be created by the system, through hot folder or e-mail monitoring. In these cases, they will be displayed in the list of records, and it will be possible to edit their data according to the parameterizations established in the capture configuration.
Upon creating or accessing the batch data in the Execution > Capture (CAP006) menu, some operations are available:
Sorting files and documents
The imported files will be displayed according to the following example. The grouping of the files will vary depending on the batch type set in the capture configuration:
| Multiple documents | The files will be displayed grouped in the "Loose files - Will comply the batch rules" option. In that case, in the "Separation" step, it is possible to create the documents with which the files will be associated. |
| Single document | The files will be displayed already associated with a document, and it will not be possible to create new documents. In this case, the files will be displayed grouped in the "No title" section. To define a title for the grouper (document), click on the "Edit" icon and fill out the following fields: • ID #: Enter a number or code to identify the document. • Title: Enter a name for the document. • Category: If the "Dynamic category selection" option is checked in the capture configuration, click on this field to change the categories that will classify the document created from the batch. If this option is not checked, the document will be created in the category defined in the capture configuration. If, in the "Processing" section of the capture configuration, it was set that the ID # and/or title will be filled out from an index or relationship variable, this procedure will occur when executing the "Relationship" step. In case these fields are filled out in the Capture step, the data entered will be overwritten with the values set in the "Processing" section. |
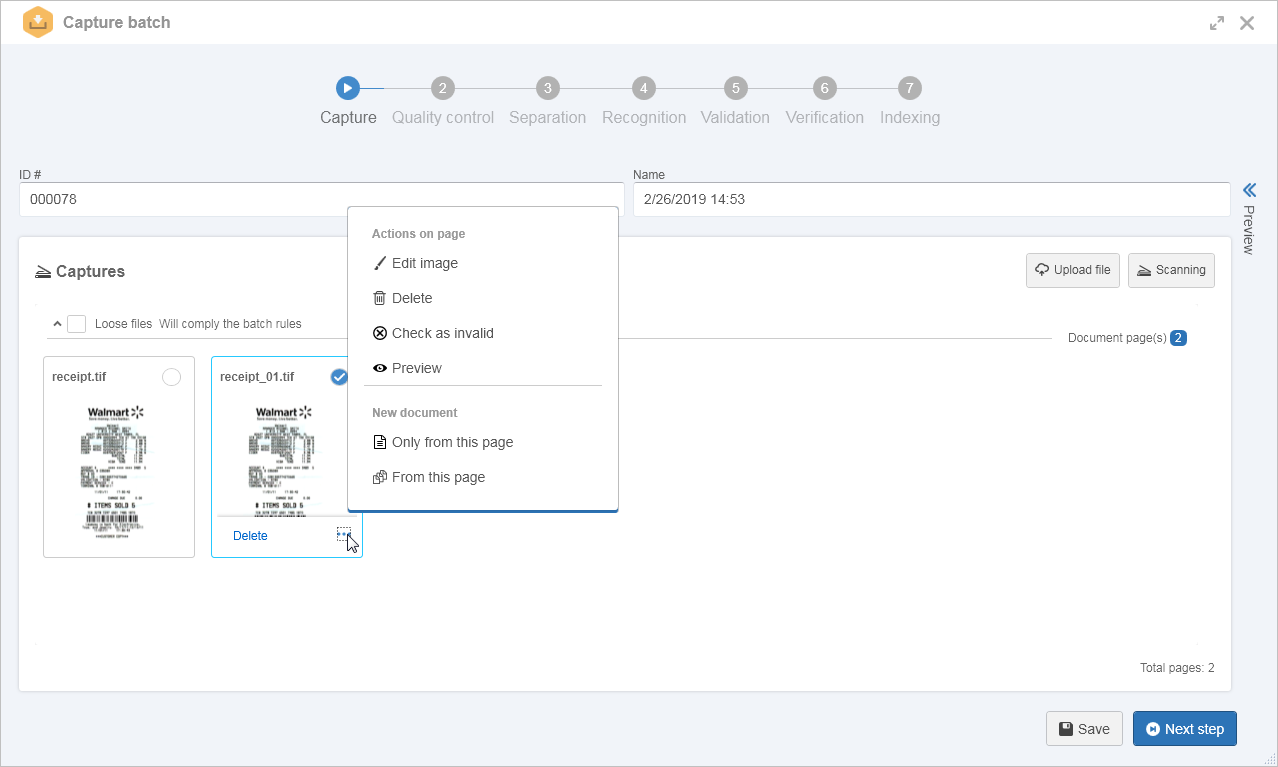
Actions on page
Upon clicking on the  image displayed below the image miniature or right-clicking on the miniature, the following options will be displayed:
| Editing an image | This option will only be available if the imported file is an image. Clicking on it will open a screen with the options that will allow enhancing the image. |
| Delete | Allows deleting the selected file. |
| Check as invalid | Defines the file as an invalid page. |
| Check as valid | This option will only be available if the selected file was checked as "Invalid". In this case, use it to make the file valid again. |
| Unmark page as blank | This option will only be displayed if the file is detected with a blank page by the system. Select it to indicate that the file is not related to a blank page. The blank page detection is configured in the "Capture" section of the capture configuration. |
| Preview | Select this option so that the preview panel is expanded, which allows viewing the selected file. The file can only be successfully previewed if it is an image (tif, tiff, gif, png, jpg, jpeg, and bmp) or a pdf. The preview panel may be expanded and hidden from the option displayed on the right side of the screen. |
After the creation, if the capture batch screen is closed, simply select the record in the Execution > Capture (CAP006) or My tasks > Capture screens and click on the  button on the toolbar to edit the batch data in the current step.
The steps the batch may go through, enabled during the creation of the capture configuration, are described below:
Capture
This is the first step of the capture process and it starts once the batch is created. Thus, as long as the created batch is not sent to the next configured step, it will remain in the Capture step, in order for the necessary adjustments to be performed.
After making all the necessary adjustments, the responsible team must send the capture batch to the next configured step.
The files can only be added or deleted from the batch while it is in the Capture step.
Quality control
In this step, you must perform an inspection to detect possible failures that may have occurred during the scanning process.
It should also be verified if the controls defined in the capture configuration were executed correctly.
If the file is an image, it can be manipulated in order to improve its quality. To do that, select the desired file, click on the option, and click on Edit image. At this point, a screen will be opened with the options that will allow enhancing the image.
The option to expand the preview panel will also be available, which allows viewing the selected file. The file can only be successfully previewed if it is an image (tif, tiff, gif, png, jpg, jpeg, and bmp) or a pdf.
If it is identified that the file must be discarded and captured again, the batch must be returned to the capture step.
To do that, select it on the list of records on the main screen and click on the  button. On the screen that will open, select the Return to Capture option and save the record. The batch will be available for the team responsible for the capture step to perform this procedure again.
If the file has a good quality, the batch must be sent to the next configured capture step.
Document separation
In this step, the document separation from the capture batch is validated, regardless of whether it has been done automatically or manually.
The separation validation consists of identifying and correcting any errors that might have occurred in the separation process, verifying that the sorting of the document files (pages) is duly performed, as well as assigning specific data to the document: category, ID #, and name.
The batch screen in the Separation step will be displayed according to the following example:
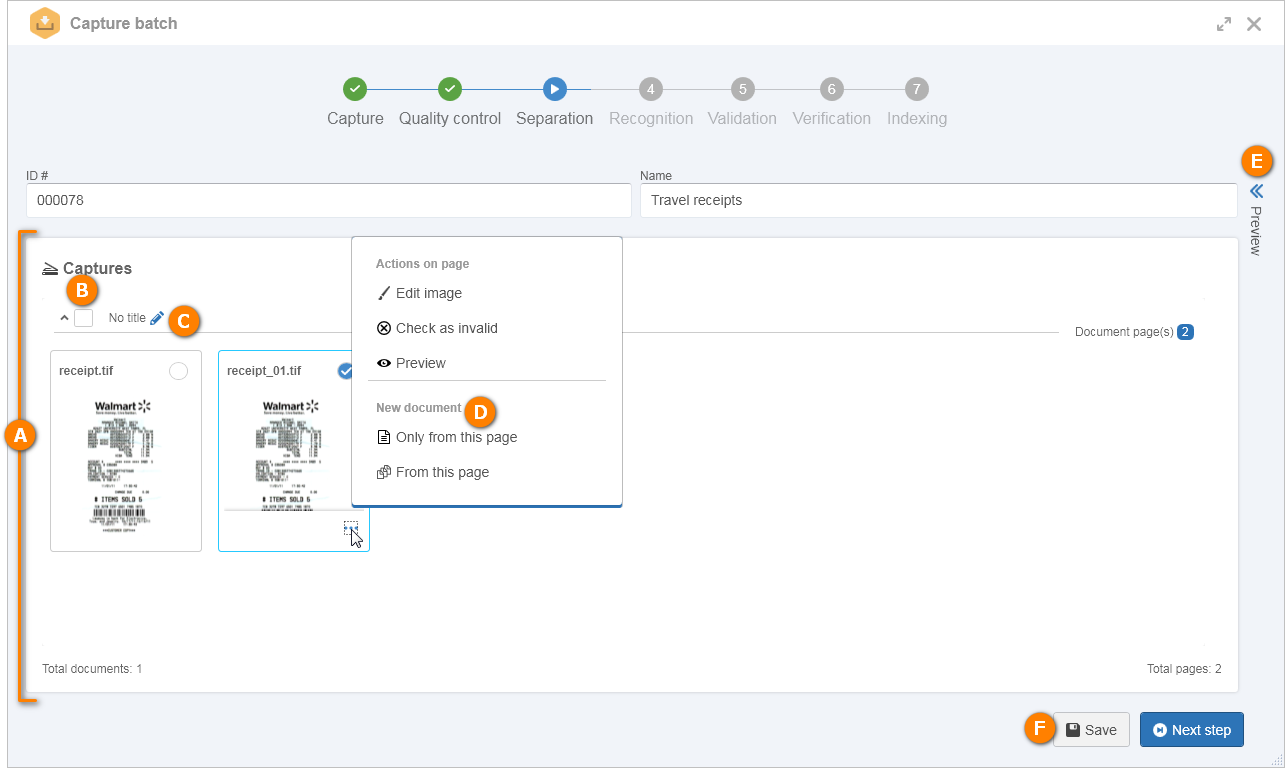
A In the Captures panel, the files that make up the batch are displayed. If the separation is being performed during the capture step, the files will be displayed in the "Loose files - Will comply with the batch rules" grouper. If the separation is being performed in the "Separation" step, the files will be displayed in the "No title" grouper.
If it was parameterized in the capture configuration that document separation is automatic, but a manual separation is performed in the Capture step, then the system will automatically separate only the files in the "Loose files - Will comply the batch rules" grouper.
B Click on each grouper to hide it and thus hide the files that compose it or expand it and view the files.
To delete a grouper (document), it is first necessary for it to be empty. To do that, disassociate the files and check the option that corresponds to it. Once done, click on the Delete button that will be displayed at the bottom part of the Captures panel. Then, confirm the request made by the system to perform this operation.
C To define a title for the grouper (document), click on the icon and fill out the following fields:
- ID #: Enter a number or code to identify the document.
- Title: Enter a title for the document.
- Category: If the "Dynamic category selection" option is checked in the capture configuration, click on this field to change the category that will classify the document. If this option is not checked, the document will be created in the category defined in the capture configuration.
If, in the Processing section of the capture configuration, it was set that the ID # and/or title will be filled out from an index or relationship variable, this procedure will occur when executing the "Relationship" step. In case these fields are filled out in the Capture step, the data entered will be overwritten with the values set in the Processing section.
D To create a new document that the file will be associated with, first, select the desired file. Then, click on and select the desired option:
- Only from this page: Allows separating the selected file into a new document.
- From this page: Allows separating the selected file and all files that follow it into a new document.
Another way to create a document is to select several files and click on the New document option that will be displayed at the bottom part of the Captures panel.
The batch can be divided into as many documents as desired.
E On the right side of the screen, there is an option that allows expanding and hiding the Preview panel. If the file is an image (tif, tiff, gif, png, jpg, jpeg, and bmp), it will be possible to view its content.
It is also possible to view the indexes configured in the recognition profile associated with the capture configuration of the batch.
F After setting all the necessary configurations, save the batch. This operation does not send it to the next configured step.
If the documents are duly separated, the batch must be sent to the next configured capture step.
• The manual document separation can be performed both in the Capture and in the Separation steps.
• During the step of document separation, it will not be possible to add new batch files or delete files. To do that, it is necessary to return the batch to the "Capture" step.
• The capture batch will NOT go through this step if the batch type of the capture configuration is "Single document" or if it is configured that the validation of the document separation is automatic.
Recognition
In this step, the OCR (Optical character recognition) is performed in the batch files to extract the values of the indexes as editable text.
This procedure will be performed successfully if the Recognition section of the capture configuration is properly configured.
If a scheduling is set to perform the recognition, the system will execute and release the batch to the next step, according to the set interval. Otherwise, the batch must be sent manually to the next configured capture step.
• The OCR service execution is already installed with a solution.
• In the "Validation" step, it will be possible to verify if the values of the indexes have been extracted correctly.
Validation
At the time of OCR execution, some characters may not be properly recognized, and the correct spelling of the result produced must be performed manually.
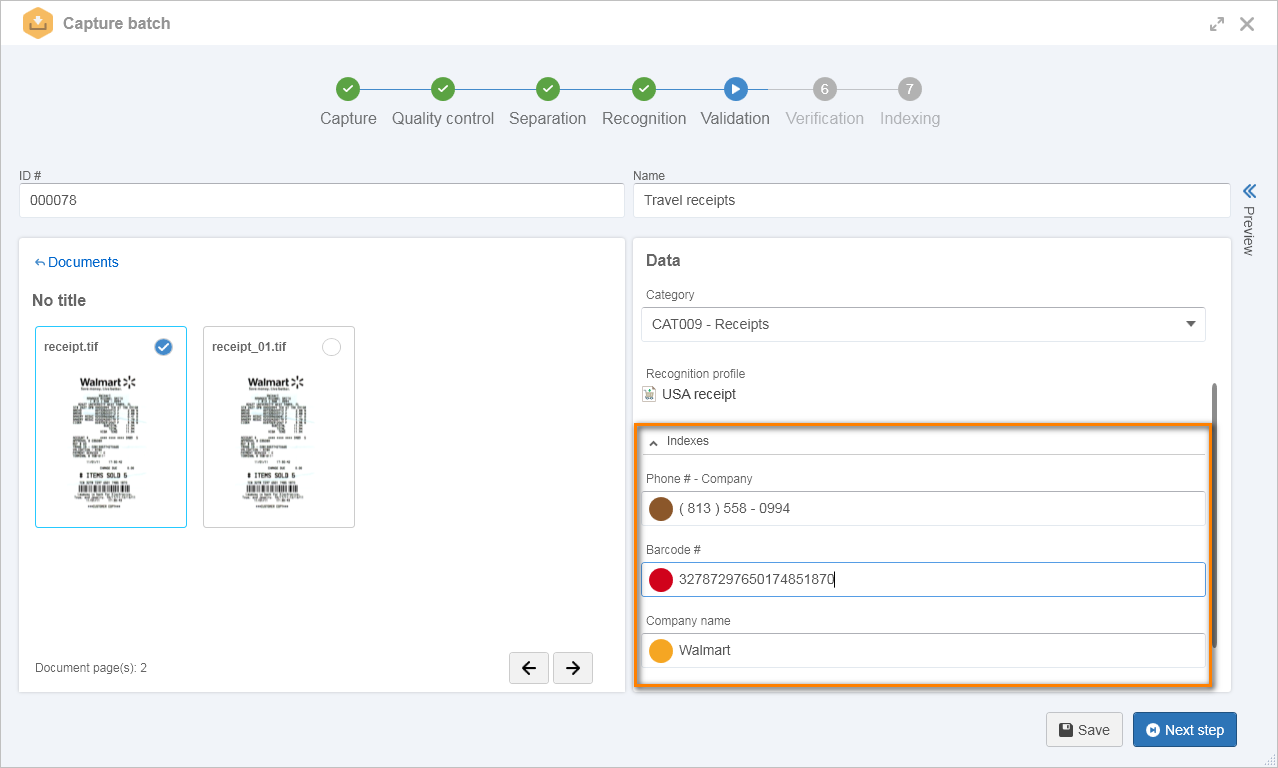
In this step, the validation of the values of the indexes extracted in the Recognition step is made.
With the batch screen open in the Validation step, one panel will display the files that make up the document and the other will display the document data and the indexes with the completed values. To validate the document indexes, click on the desired document.
The value of each index will be presented according to the validation rules parameterized at the time of its configuration. To correct a value, click on the field that corresponds to the index whose value was recognized incorrectly and perform the necessary correction:
If necessary, it is possible to return the capture batch to one of the previous steps, so that the procedures are redone and the end result of the OCR process can be obtained with a better quality.
To do that, select it on the list of records on the main screen and click on the button. On the screen that will open, select the Return to option to return it to the desired step and save the record.
The batch will be available for the team responsible for the selected step to execute it again.
If the indexes are filled out correctly, the batch must be sent to the next configured capture step.
Typing
In this step, it is possible to type the values of the indexes.
With the batch screen open in the Typing step, one panel will display the files that make up the document and the other will display the document data and the indexes. Click on the document whose indexes you wish to type.
To enter a value, click on the field that corresponds to the desired index and type the desired value.
When all indexes are duly filled out, the batch must be sent to the next configured capture step.
Relationship
In this step, the system performs the relationship between the data and indexes of the batch document with the metadata configured in the capture configuration. The processing defined in the Indexing section of the capture configuration is also executed.
The execution of this step is done automatically, according to the configurations performed in the Relationship section of the capture configuration, and it is possible to configure its frequency by using the Configuration > General parameters > Capture menu of the Document component. Thus, this step will be executed with the same frequency set for the indexer service.
The batch will remain in this step until all the documents contained in it find a metadata record that satisfies the relationship defined in the configuration of the capture.
If necessary, it is possible to edit the data of the documents that are created from the batch and the values of the indexes, but it is not possible to send the batch to the next step.
It is important that the configurations in the Relationship and Indexing sections are properly parameterized; otherwise, the system will not be able to perform this step, making it impossible for it to release the batch to the next step.
Verification
At this step, it should be verified if all the procedures performed in the previous steps obtained the desired result and whether the batch is eligible to be indexed.
According to the parameterizations established in the Verification section of the capture configuration and according to the steps that the batch went through, it will be possible to edit the data recognized by OCR, edit typed data, and edit the document separation and the data imported through relationship.
If a content was not properly recognized due to the incorrect location, it will also be possible to edit the location of the index.
If necessary, it is possible to return the capture batch to one of the previous capture steps; however, if the batch is duly verified and it is eligible to be indexed, it must be sent to the next configured capture step.
If in the capture configuration is configured that the verification will be done by workflow, the batch will remain pending in this step while the responsible parties perform the workflow verification activities in SoftExpert Workflow.
When the workflow execution is ended, the batch is sent to the indexing step.
For this resource to function properly, the process associated with the Verification section of the capture configuration must be modeled without errors and enabled to be instantiated.
Refer to the specific documentation of the Workflow component for more details on executing a workflow.
Indexing
This is the last step in the capture process and in it are created the documents defined in the batch document separation in SoftExpert Document, making them available for viewing to other users.
While the batch is not released by the system, it is possible to view the batch data and edit some document data. See more details in the Viewing batch data article.
The execution of this step is done automatically and you can set your frequency by using the Configuration > General parameters (DC035) > Capture menu of the Document component.
• During the indexing of the documents, the category configurations to which it belongs will be applied. At this point, the "Indexing approval", "Publication acknowledgment", and "Archiving" tasks may be generated. See the specific documentation of the SoftExpert Document component for more details about tasks.
• The documents created in this step may be viewed through the View > Document (DC021) menu.
The following buttons are available in the lower part of the screen:
- Save: Saves the adjustments and changes made in the batch.
- Next step: Sends the batch to the next configured step.
The batch can be sent to the next step both through the "Next step" option of the batch data screen and through the button on the main screen toolbar.
It is important to point out that, if the "Allow sending to the next step without editing the batch" option is not checked in the capture configuration of the batch, it will not be possible to perform this operation without first accessing the batch data screen.
Conclusion
This article covers the options available during the execution of the capture steps.
For further details on the capture flow, click here.