Timesheet via calendar
Prerequisite
- Access to the Tools > My calendar menu.
Introduction
Using a timesheet in the calendar is a feature for users who search for agility, as long as the object in which time will be entered is configured for this purpose.
See below a practical example of using this feature to optimize time management:
Timesheet via calendar
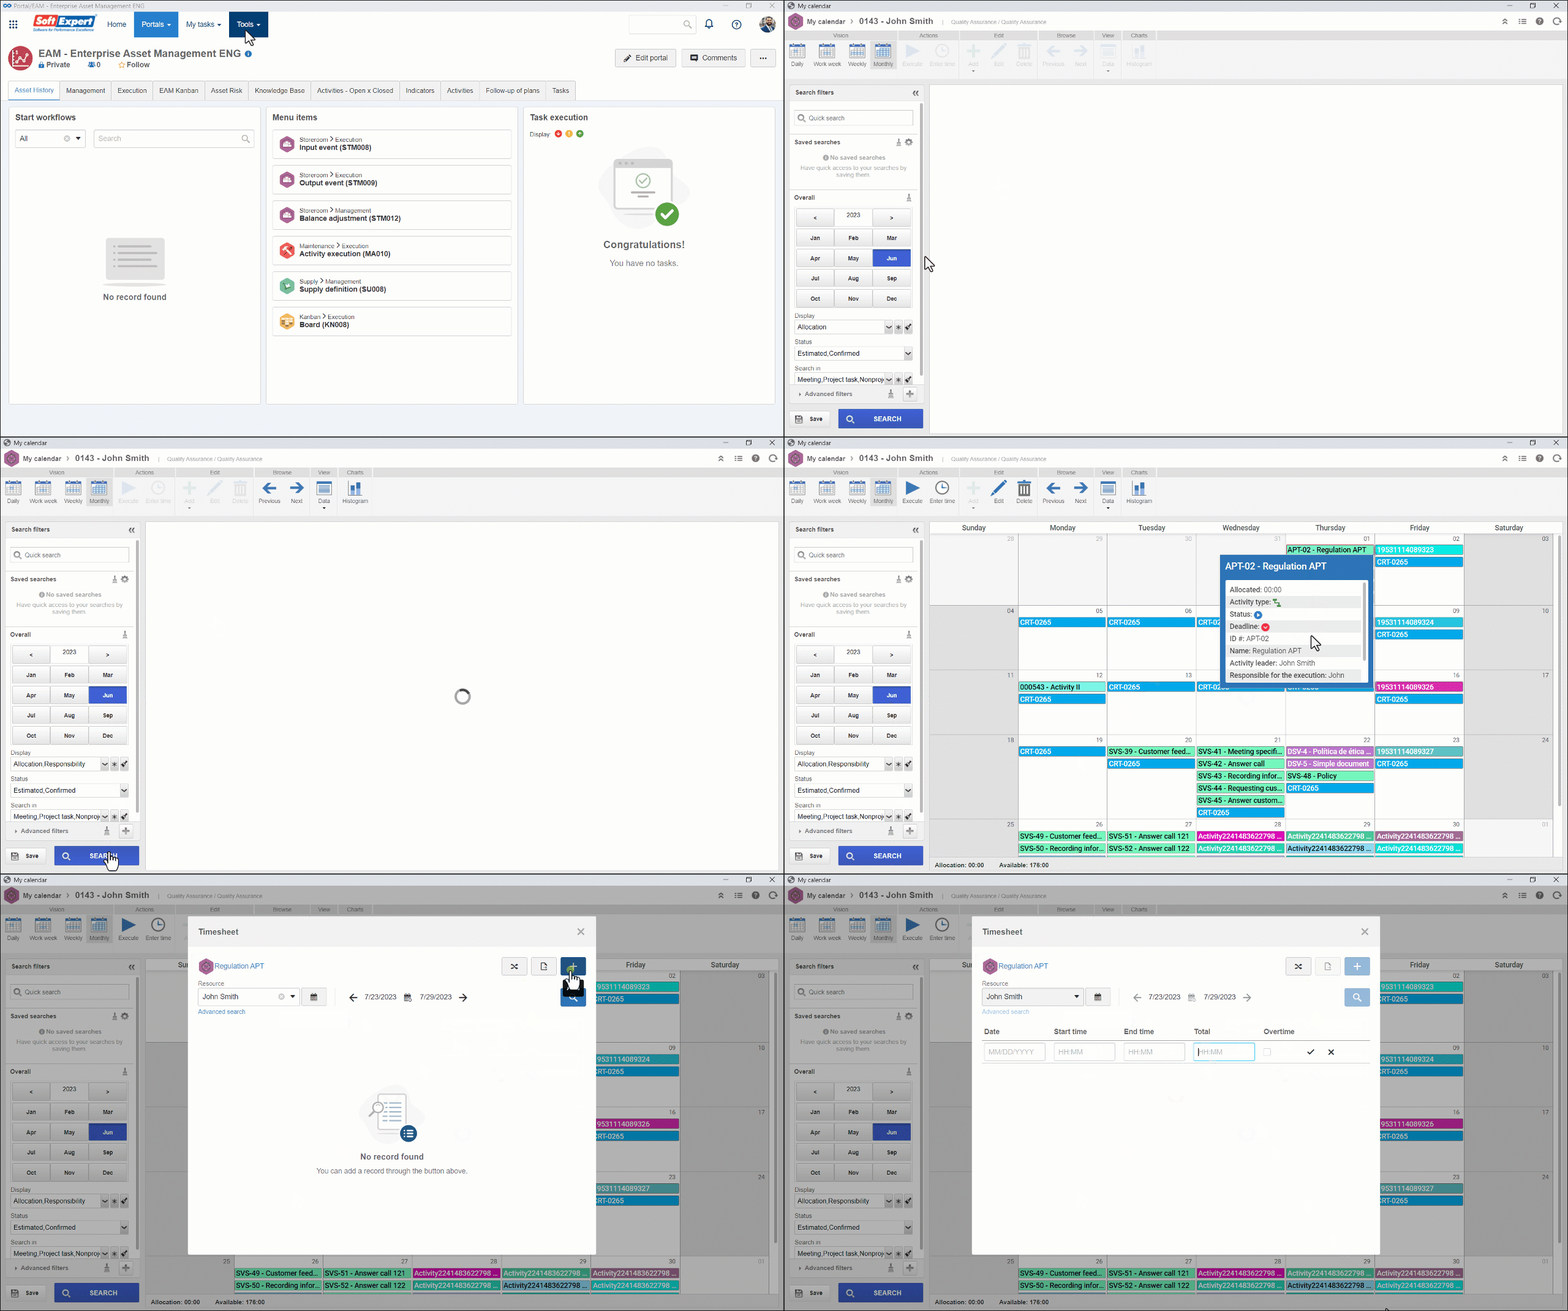
1. Access the Tools > My calendar menu.
2. Select a date, enter the object name in the Quick search field, and click on the Search button.
3. Once done, click on the Enter time button.
4. On the timesheet screen, simply select total or schedule range timesheet. For further information, refer to the Schedule range timesheet or Total timesheet articles.

5. After doing that, click on the  button.
It is worth noting that the calendar can also be used for other object types, such as nonproject tasks, monitored events, isolated actions, corrective and preventive maintenances, calibrations, and verification activities.
Complementary resources
See further details regarding each field available on the "My calendar" screen:
Toolbar
Vision
Click on the corresponding button to define the period that will be applied to the display of the objects in the calendar.
In the General filter of the Search filters panel, the system will display a calendar, allowing the selection of the desired day, week, month, and year.
Actions
| Execute | Click on this button to start or finish the execution of an activity or send it to the next step. |
| Enter time | Click on this button to enter the time spent for the execution of the object selected in the calendar. Note that this button will only be enabled if the "Allow timesheet" option is checked on the selected object type data screen. |
Edit
| Add | Click on the arrow below this button and select the corresponding option to add the desired activity. |
| Edit | Click on this button to edit the data of the object (nonproject task, isolated action, monitored event, project task, etc.) selected in the calendar. Refer to the specific documentation of the selected component for further details about the data screen that will be displayed. |
| Delete | Click on this button to delete the resource allocation to the object selected in the calendar. The record is deleted through the component to which it belongs. |
Browse
| Previous | Click on this button to go to a period prior to the one displayed in the calendar. |
| Next | Click on this button to go to a period later than the one displayed in the calendar. |
View
| Data |
Click on the arrow below this button and select the desired option: Activity: Allows viewing the data of the monitored event action (isolated or planned), maintenance (preventive or corrective), meeting, nonproject task, project task, and calibration or verification task selected in the calendar. Object: Allows viewing the data of the project or action plan, depending on the object selected in the calendar. Resource: Allows viewing the data of the resource in question. |
Charts
| Histogram | Click on this button to view the usage chart of the resource. |
Refer to the specific documentation of the selected component for further details about the data screen that will be displayed in each case.
In order for the resources described above to function correctly, it is necessary for the components involved (SoftExpert Meeting, SoftExpert Time Control, SoftExpert Project, SoftExpert Action Plan, SoftExpert Asset, and SoftExpert Maintenance) to be part of the solutions acquired by your company and for the user to have the proper permissions (add, delete, edit, etc.) enabled.
Conclusion
This article has displayed the steps to enter the time through a calendar. Continuing in our action flow, see how to view a timesheet.


