Configuring the timesheet
Prerequisite
- Access to the data screen of the object to which the timesheet will be configured.
Some activities do not require prior configuration, such as SoftExpert Kanban tasks and monitored events.
Introduction
To be able to enter the timesheet, it is necessary to configure the object to which the time will be entered.
The menus to access the object screens vary for each component.
Check the objects in which this configuration is available
- Isolated actions.
- Action plans.
- Nonproject tasks.
- Project tasks.
- Verification activities.
- Calibrations.
- Preventive and corrective maintenances.
From version 2.2.0 onwards, activities related to problems and incidents no longer have the timesheet option.
In case of questions, we recommend viewing the articles of the specific components for further details on their data screens.
For a better understanding, the example below will show you how to configure the timesheet for the desired object.
Configuring a timesheet in an object
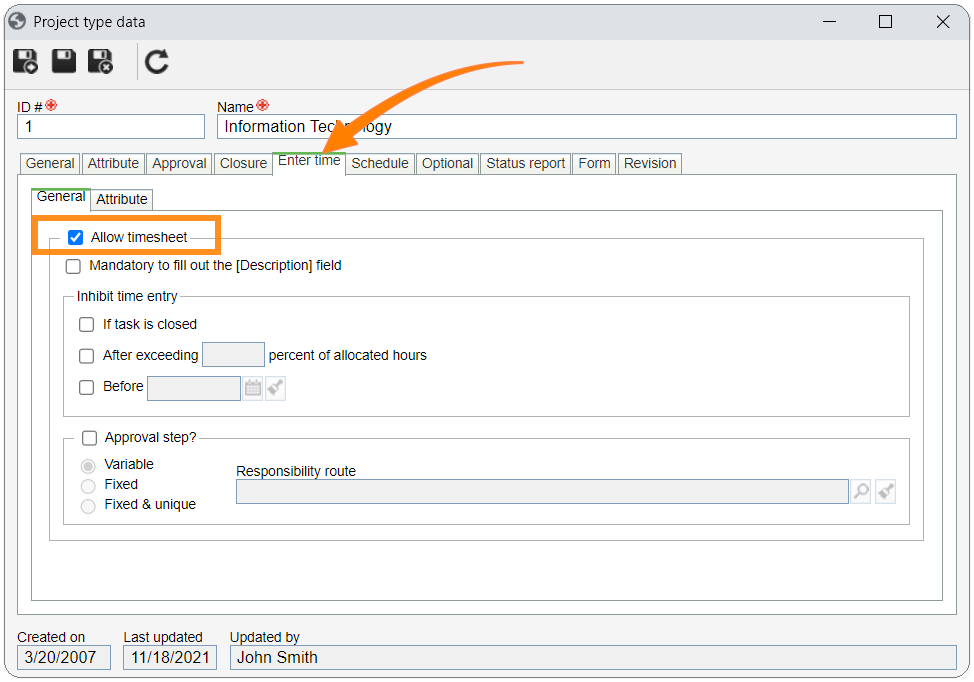
1. Select the object to be configured.
2. Access the data screen of the selected object.
3. Click on the Enter time tab.
4. Select the Allow timesheet field.

See further details on the configurations of the Timesheet tab:
Customization options
| Field | Function |
|---|---|
| Mandatory to fill out the Description field | By enabling this option, it will be mandatory to add a description when entering the time for an object. |
| Inhibit time entry |
This field allows selecting 4 options: Approved: the timesheet will be blocked after the approval of the timesheet for the actions. If object is closed: when the objects are closed, the timesheet will be blocked. If the hours entered exceed the planned hours by ___ percent: the timesheet will be blocked after a specific allocation percentage is reached for resources in the action. Fill out the field with the desired percentage. Prior to date: choose a deadline to block the timesheet in actions of this category. |
| Approval step? |
This field allows selecting 3 options: Fixed: the approval will be executed by the user assigned in the route. Variable: the user has the flexibility of defining the approval during the timesheet process. Fixed & unique: automatically adds the user specified in the route as responsible for the approval. This is the only option in which the Responsibility route field is required to be filled out. |
Conclusion
Upon configuring the timesheet option, entering time will be enabled in the object. Follow the next step of the flow to learn how to perform this action.


