Configuring the Indexing section
 |
 |
 |
 |
Prerequisites
- Access to the File > Capture configuration (CAP005) menu.
- Previously recorded capture configuration.
Introduction
In the Indexing section on the Details tab, it is possible to establish the output settings and the processing of the capture batch when executing its indexing.
This is the last step in the capture process, in which the documents generated from the capture batch will be created. Note that these documents will be created in SoftExpert Document.
See how to configure this section:
Configuring the Indexing section
1. Access the File > Capture configuration (CAP005) menu.
2. Search for and select the previously created capture configuration and click on the  button.
3. Click on the Details tab and access the Indexing section.
4. This section is divided into two sub-tabs. Configure the necessary information for each one:
Output Settings
In this sub-tab, you can establish the output settings of the capture batch files.
Perform the following adjustments:
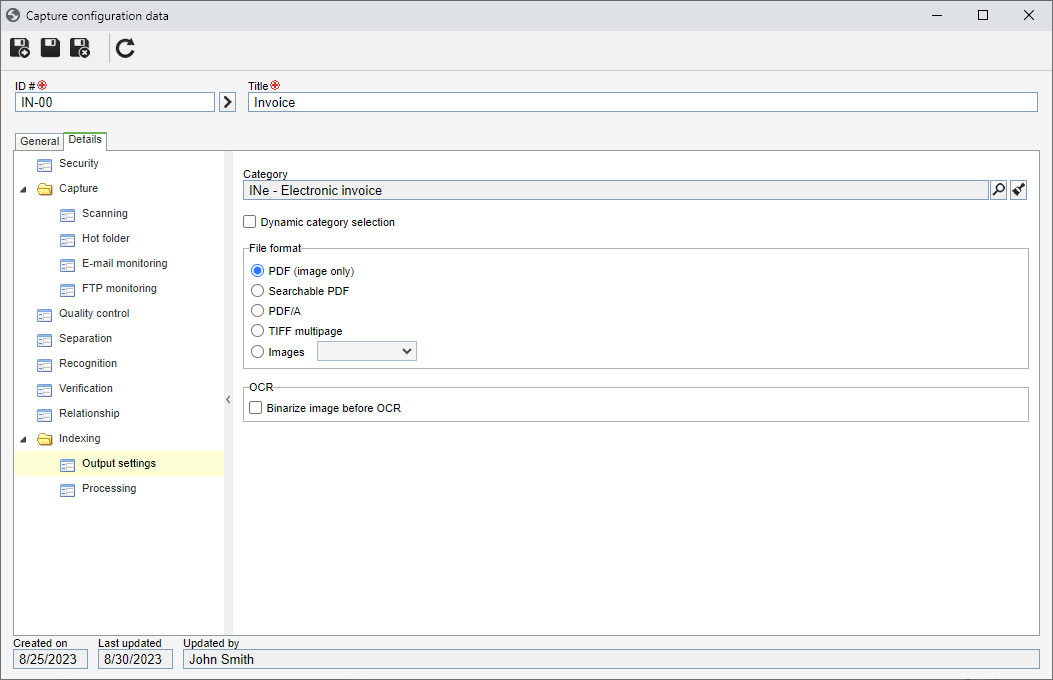
1. In the Category field, select the category recorded in SoftExpert Document in which the batch documents will be saved.
2. Check the Dynamic category selection option to allow the selection of a different category for each batch document (if there is more than one document in the batch) and the definition of the category through a recognition profile index, in the execution of the indexing step.
3. Choose the format of the file that will be generated:
| PDF (image only) | Select this option for the electronic files to be saved in the PDF bitmap format, that is, if the electronic file contains a text, it will not be possible to search for words in it. |
| Searchable PDF | Select this option for the electronic files to be saved in PDF format and after passing by the OCR, to be possible to perform the word searches in its content. |
| PDF/A | Select this option to save the electronic files in the PDF/A format, also known as ISO 19005-1. This format consists of an archiving standard, ensuring the long-term preservation of the electronic files so that they can be viewed in the same way as time goes by. This option does not allow searching for words in its content. |
| TIFF multipage | Select this option for the electronic files to be saved in the document in the TIFF multipage format. TIFF is a high-resolution graphic format based on tags used for the interchange of digital graphic elements. Through the tags feature, a single multi-page .tiff file can store several images along with related information such as compression and orientation type. |
| Images | Select this option for the electronic files to be saved in the document in the image format. In the field next to it, select the desired extension: TIFF, JPEG, or GIF. |
4. Lastly, check the Binarize image before OCR option to have the system convert the batch image to black and white before any OCR operation. For example, if the image used by the batch is colored or grayscale, when a capture step in which OCR is required is performed, the system will binarize the image, perform the OCR, and then discard the black and white image, keeping the colorful image.
• The Binarize image before OCR option is only available for editing after saving the record for the first time, if the Recognition step is parameterized and the file format is "searchable PDF".
• After saving the capture configuration record for the first time, if the selected category has associated attributes, these may be used in the "Processing" tab.
Processing
In this section, the data that will be created in the category selected in the "Output settings" section is configured.
To do that, click on the  button on the side toolbar. On the screen that will be displayed, configure the following fields:
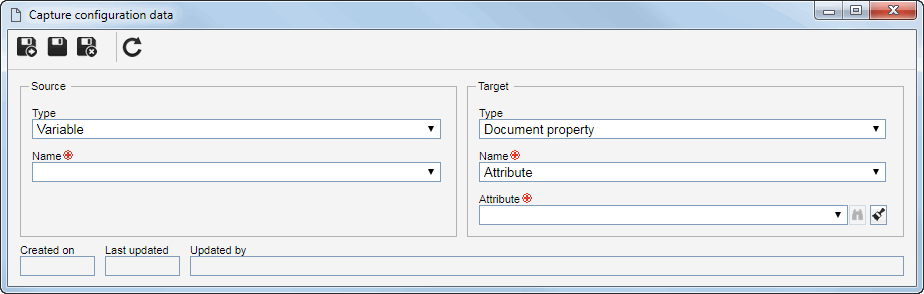
Source
Define the location from which the data that will be used to compose a property of the document created from the capture batch will be retrieved.
In the Type field, select the desired option:
| Variable | The origin data will be a variable previously recorded in the system. In the Name field, select the desired variable. |
| Database | The source data will be one of the template metadata used in the service associated with the capture configuration. In the Name field, select the desired metadata. |
| Webservice data source | The source data will be a return variable of the Web Service associated with the capture configuration. In the Name field, select the desired metadata. |
| Recognition profile | The source data will be one of the indexes configured in the recognition profile associated with the capture configuration. To do so, fill out the following fields that will be displayed: • Recognition profile: If the batch type is "Multiple documents" and the document type is "Image", and more than one recognition profile is associated with the capture configuration, you can select the recognition profile you wish to use as the source data. Otherwise, this field will be filled in by the system with the recognition profile associated with the capture configuration. • Index name: Select the index of the previously selected recognition profile that you wish to use as the source data. |
| # of pages | The origin data will be the page number that the document contains. |
| File name | The source data will be the name of the imported file in the batch. If the document has more than one file, the name of the first file in the document will be used. |
| Fixed value | The source data will be a preset value. In this case, enter the desired value in the respective field. |
• The Database type will only be available if the capture configuration has relationships configured in the "Relationship" section.
• The Web Service data source type will only be available if the Relationship section defines that it will take place through a "Web Service data source".
• The Recognition profile type is only available if the capture configuration has a recognition profile associated with the "Recognition" section.
Destination
Configure the location in which the value obtained through the source will be used in the document created from the capture batch.
In the Type field, select the desired option:
The other fields displayed for completion vary according to the chosen Type.
Type: Document property
By selecting this option, the value will be a property of the document that will be created.
In the Name field, select the desired property:
| ID # | The value will be used in the "ID #" field of the document created from the batch. |
| Title | The value will be used in the "Title" field of the document created from the batch. |
| Summary | The value will be the "Summary" field of the document created from the batch. |
| Attribute | The value will be applied to the attribute of the document created from the batch. In the "Attribute" field that will be enabled: • The attributes associated with the category that was selected in the "Output settings" tab will be displayed, if any. • If the "Dynamic category selection" option was checked, all attributes recorded in the Document component will be available for selection. |
| Complex file container | The value will be used in the "Complex file container" field of the document category created from a batch. |
| Category | The value will be used in the "Category" field of the document created from a batch. |
Type: New variable
After selecting the option, in the Name field, enter the name of the variable that will be created containing the value of the source data.
Type: Existing variable
After selecting the option, in the Name field, select the desired variable. The variable value will be the obtained value.
If desired, check the Concatenate variable value field to have the value obtained from the source concatenated after the existing value.
If the option remains unchecked, the data obtained from the source will replace the value of the selected variable.
Type: Regular expression
After selecting the option, in the Name field, enter a name for the regular expression. This name will be available as a new variable, which can then be the source of a document property.
In the Pattern matching field, enter the regular expression from which the source value will be obtained.
Type: Form field
The value is the data retrieved from a field of the form associated as a template in the document category that was selected in the "Output settings" tab.
For this feature to work correctly, it is necessary for SoftExpert Form to be part of the solutions acquired by your organization.
After selecting the option, in the Entity field, select the template form of the category to which the document belongs.
In the Entity field, select the field of the form which the desired value will be obtained from.
Type: Extract text function
By selecting this option, the target field will be an excerpt extracted from the previously defined source.
After selecting the option, in the Name field, enter a name for the function. This name will be available as a new variable, which can then be the source of a document property.
In the Initial character field, enter the number that corresponds to the position of the character which the extraction of the text will start from. For example, when entering the number 1, the extraction will begin from the first character introduced in the text.
In the Number of characters field, enter the number of characters, from the initial character, that will be extracted to form the desired value. For example, if the initial character is 1, and 5 characters are entered, the desired value will be formed from the 1st to the 5th character.
Type: Wrap text function
By selecting this option, the target field will be a piece of text from the source defined previously.
After selecting the option, in the Name field, enter a name for the function. This name will be available as a new variable, which can then be the source of a document property.
In the Delimiter field, enter the character that will be used when wrapping the text. For example, when the ";" character is entered and the source is composed by the "Name;date;marital status" value, the system will wrap the text into 3 values: "Name", "date", and "marital status".
In the Position field, enter the number corresponding to the path that you wish to use as the value. For example, when entering the value 2, in the above example, only the "date" value will be used.
After performing the necessary configurations for the Source and the Destination, click on the  button.
Conclusion
Thus, the Indexing section has been duly configured. For further information on the configurations of the other steps, refer to the Configuring the capture configuration details article.
After setting the necessary configurations for all steps, it is time to execute the capture.