Configuring the Quality control section
 |
 |
 |
 |
Prerequisites
- Access to the File > Capture configuration (CAP005) menu.
- Previously recorded capture configuration.
Introduction
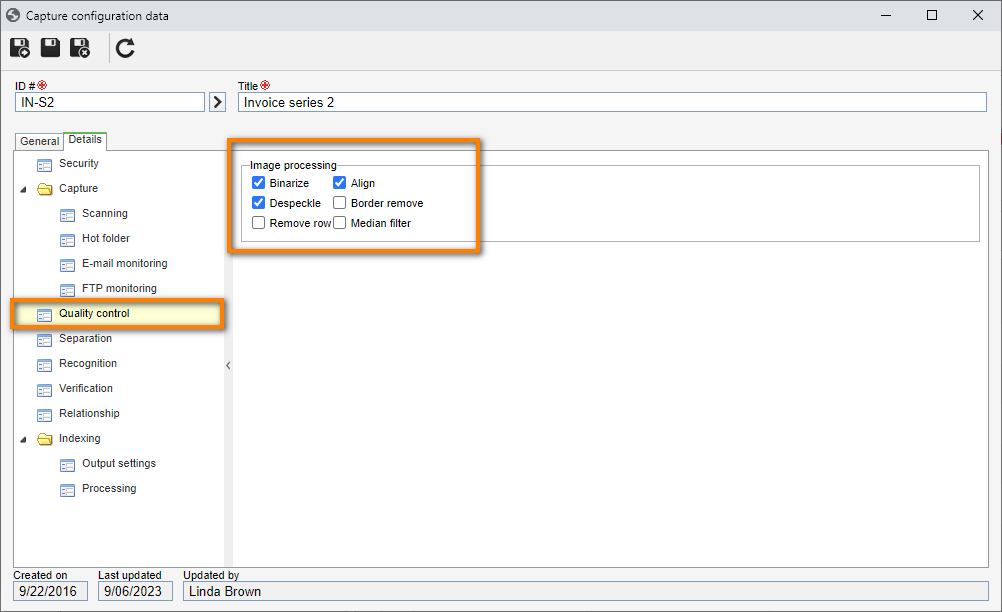
In the Quality control section on the Details tab, it is possible to establish the parameterizations related to the image processing of the capture batch.
This section will only be available for editing if the Quality control step is enabled in the configuration of the capture being edited.
See how to configure this section:
Configuring the Quality control section
1. Access the File > Capture configuration (CAP005) menu.
2. Search for and select the previously created capture configuration and click on the  button.
3. Click on the Details tab and access the Quality control section.
4. The available options vary according to the capture configuration document type:
Image
Enable the desired options to apply the quality control to the batch images:
| Binarize | Enable this option to convert the image to black and white. The other options will only be enabled after this is checked. |
| Despeckle | Enable this option to remove the dirt, unwanted spots, or other noises that may have been inserted into the image during the scanning process. |
| Remove row | Enable this option to remove the lines in the image (both the original lines of the file and those that were introduced during the scanning process). The presence of lines in the image, especially vertical lines, may interfere with the OCR process. It is important to note that the removal of horizontal lines may have an impact on the size of the image, decreasing it. |
| Align | Enable this option to correct the alignment of the image in case of misalignment during the scanning process. |
| Border remove | Enable this option to automatically detect and remove the edge of the image to improve image definition. |
| Median filter | Enable this option to apply the "Median" filter to the image to reduce the noises (especially "salt-and-pepper" noises). The "Median" filter replaces the intensity of each pixel by the median of the intensities of adjacent pixels, reducing the amount of intensity variation between one pixel or the other. |
Remember to click on the  button on the capture configuration data screen to save the changes.
Document type: XML
When the capture batch file is an .xml file, its quality control is done through .xsd files.
The .xsd file (XML Schema Definition) is used to validate which fields the XML should contain, what their types are, whether they are mandatory or not, etc.
To add an .xsd file to this section, perform the following steps:
1. Click on the  button on the side toolbar.
2. On the screen that will be opened, click on the button on the File field to select the .xsd file.
3. In the Type field, enter whether the selected file is main (the file that contains the main structure of the XML) or auxiliary (files from which the main file is dependent).
4. Click on the  button if it is necessary to add more files; otherwise, click on the
  button.
5. Select the structure contained in the main file that will validate the .xml file that is used in the batch.
• If the document type is XML and the Quality control step is enabled, it will not be possible to save the capture configuration without selecting a structure.
• If only one .xsd file is added, it will automatically be defined as main.
• The  button allows deleting the file selected in the list of records.
Remember to click on the button on the capture configuration data screen to save the changes.
Conclusion
Thus, the Quality control section has been duly configured. For further information on the other configurations, refer to the Configuring the capture configuration details article.