Create a waste without revision control
This topic will teach you how to create a waste without revision control from scratch.
To this end, simply follow the steps below:
1st step: Creating a waste type
A waste type classifies the wastes that will be created in the system. For example: chemical waste can be grouped by the "Chemical" type and classified as hazardous.
The configurations of a type are applied to all wastes that will be classified by it.
Moreover, it is possible to filter the searches in order for the system to search for the wastes of a certain type.
To create a waste type, access the WA018 menu and click on the  button:
On the screen that will be opened, enter "CM" for the ID # and "Chemical" for the name of the waste type.

In the General tab, fill in the following fields:
- Responsible team: Select the team that will be responsible for all wastes classified by this type. As a result, when a waste is created, the responsible team entered in this field with be shown.
If there is none, click on the button next to the field. On the screen that will open, enter an ID # and name for the team and save it. On the Member tab, associate your user with the team and click on the  button.
- Measurement unit: Set the unit through which the wastes of this type will be measured. As a result, when a waste is created, the selected measurement unit will be shown.
If there is no record previously created in your environment, click on the button next to the field and, on the screen that will open, enter an ID #, the name of the desired measurement unit, and click on the button.

Once done, click on the button.
2nd step: Creating the waste
With the type added in the previous step, it is possible to create wastes in the system. To do so, go to the WA003 menu and click on the button.
Then, select the type created in the previous step to classify the waste.
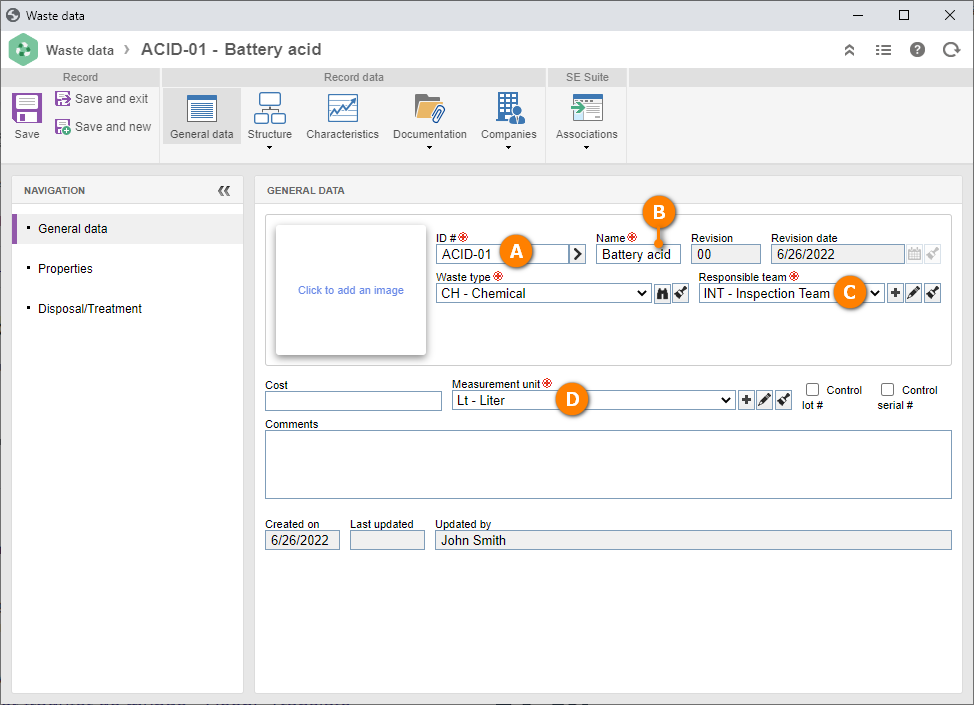
On the screen that will open, fill out the ID # field with "ACID-01". If you prefer to generate a sequential identifier, click on the arrow next to the field.
In the Name field, enter the name "Battery acid" for the waste.
Note that the Responsibility team and Measurement unit fields are completed with the default team and unit set in the type.
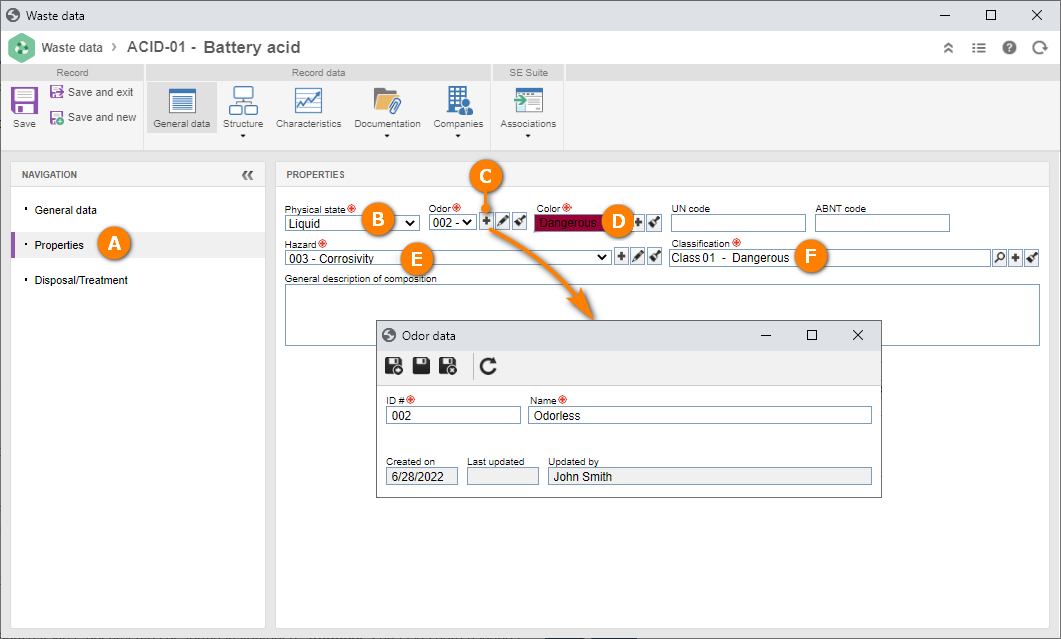
Still on the data screen, click on the Properties tab.
Fill out the fields as described below:
- Physical state: Select the "Liquid" option.
-
Odor: Click on the button and fill out the screen that will be opened with "002" for the ID # and "Odorless" for the name. After that, save the record.
-
Color: Click on the button and fill out the screen that will be opened with "Hazardous" for the name and "Red" for the color. After that, save the record.
-
Hazard: Click on the button and fill out the screen that will be opened with "003" for the ID # and "Corrosivity". After that, save the record.
-
Waste classification: Click on the button and fill out the screen that will be opened with "Class 1" for the ID # and "Hazardous". After that, save the record.
Once done, click on Save and exit. The record will be finished!
A storeroom will later be associated with this waste. Therefore, save its ID #.