Configuring the Relationship section
Prerequisites
- Access to the File > Capture configuration (CAP005) menu.
- Previously recorded capture configuration.
Introduction
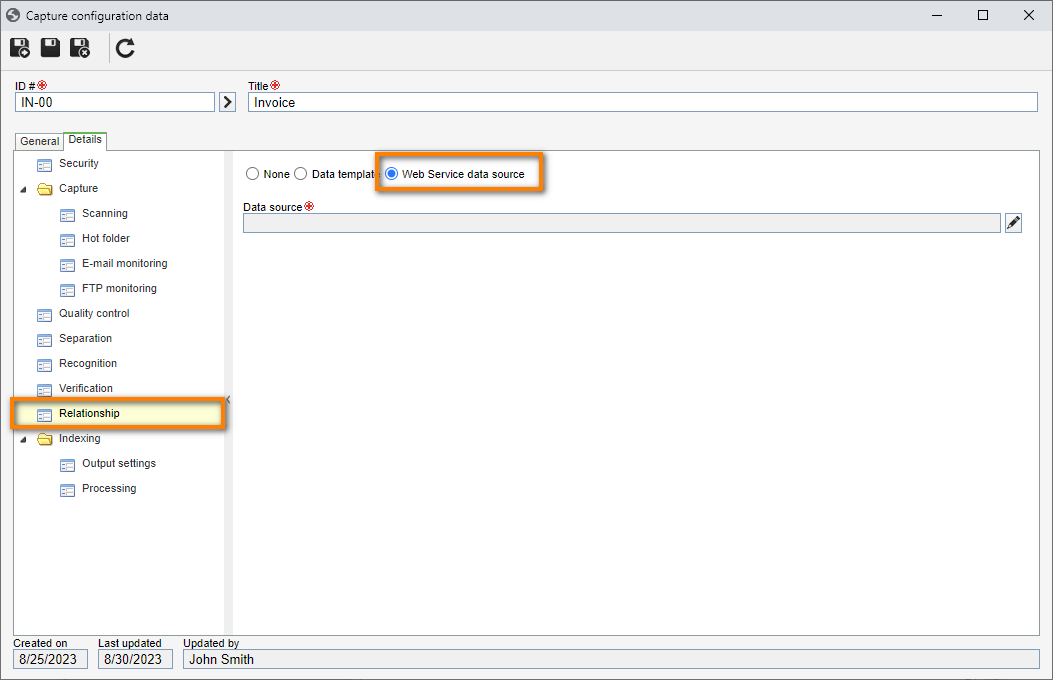
In the Relationship section on the Details tab, it is possible to configure how the data and the indexes of the batch document will be related to the metadata configured in the Indexing > Processing section.
This section will only be available for editing if the Relationship step is enabled in the configuration of the capture being edited.
See how to configure this section:
Configuring the Relationship section
1. Access the File > Capture configuration (CAP005) menu.
2. Search for and select the previously created capture configuration and click on the  button.
3. Click on the Details tab and access the Relationship section.
4. At the upper part of the screen, choose the way the relationship will be performed. The "None" option will be selected by default.
5. After selecting the desired way, perform the necessary configurations:
Data template
The Data template option allows the relationship between the documents and the external storage data to be performed through an import service.
Web Service data source
The Web Service data source option indicates that the relationship will be executed through a data source, which must have been previously created in the Administration component.
After selecting the option, click on the  button to open the selection wizard for the desired data source. Then, perform the necessary configurations through these steps:
Data source
In this step, the Web Service data sources that are already configured in the system through the Administration > Configuration > Data source > Web Service data source (AD053) menu will be displayed.
- To associate a Web Service data source, locate and click on the card that corresponds to the desired data source.
- To configure a new data source and use it for the capture relationship, click on the + Create data source button and select the Web Service data source option. At this point, the Web service data source configuration wizard opens. See the specific documentation of the Administration component for further details about the data source configuration.

This resource is not compatible with REST data sources.
Method
In this step, the system will display the methods that were enabled during the data source configuration.
To find a specific method more efficiently, enter the name of the method or attribute in the field at the top of the screen and click on the Filter button. The corresponding methods will appear at the bottom of the screen.
Upon clicking on the arrow next to each method, the input and output parameters of the method will be displayed, divided into columns. In the parameter hierarchy, it is possible to identify the data type of each parameter.
Parameters
In this step, define the input value for the selected Web Service method. To do that, click on the field to which you wish to assign a value and, on the screen that will be opened, select the desired option:
| Index | This option allows selecting one of the indexes configured in the recognition profile associated with the capture configuration. In the respective field, select the desired index. |
| Fixed text | This option allows entering a fixed value for the webservice parameter. In the respective field, enter the desired text. |
| File name | This option allows defining that the value of the parameter will be the name of the file of the batch generated from the capture configuration. |
Return
In this step, it is possible to enter a friendly name for the Web Service return variable. To do that, click on the desired field and, on the screen that will be opened, enter the text.
If a text is not entered, the name of the variable will be the name of the field. The configured return will be used later in the Processing section.
Exception treatment
In this step, the exceptions in case of execution failure must be configured.
It can be defined that the error will be ignored and the batch will be sent to the next step without performing the relationship or that the batch will be returned to the scanning step.
Summary
In this step, an overview of the Web Service data source configurations is displayed. If necessary, return to the previous steps and perform the necessary adjustments.
If all is correct, click on the Finish button. At this point, the configuration wizard will be closed.
Use the following buttons to move between steps:
- Next: Upon clicking on this button, the user is taken to the next step on the data source association.
- Previous: The user returns to a previous step of the data source association to make the necessary changes. This operation can also be performed by clicking on the name of the step on the side panel of the wizard.
- Cancel: Upon clicking on this button, the user exits the data source association wizard. Note that all the data entered up to then will be lost. To perform this operation effectively, it is necessary to confirm the question asked by the system.
Conclusion
Thus, the Relationship section has been duly configured. For further information on the other configurations, refer to the Configuring the capture configuration details article.


