Configuring the Recognition section
 |
 |
 |
 |
Prerequisites
- Access to the File > Capture configuration (CAP005) menu.
- Previously recorded capture configuration.
Introduction
In the Recognition section on the Details tab, it is possible to parameterize the execution of the Recognition and/or Typing capture steps.
This section will only be available for editing if the Recognition and/or Typing steps are enabled in the configuration of the capture being edited.
See how to configure this section:
Configuring the Recognition section
The editing options available vary according to the document type selected in the general data:
Image and Any type
If the document type is Image or Any type, in the Recognition section, it is possible to define a structure of recognition profiles and rules for the application of each of them.
See a practical example of profile association and rule creation in the video below:
• If the document type is Any type, only the recognition profile must be associated, and it will not be necessary to add rules, as the system will not perform the recognition by OCR, allowing only the user to enter the desired values during the execution of the Typing step.
• The order in which the recognition profiles are listed is important because the system considers the order when verifying which recognition profile will be applied to the batch file.
• When adding more than one rule to a profile, it is important to note that all rules will be considered by the system to apply that profile (logical operator AND).
• The default recognition profile is displayed last in the listing.
• It is possible to add as many profiles and rules as necessary.
XML
If the selected document type is XML, it is possible to perform the mapping of the XML tags to system metadata.
To perform the mapping, click on the Configure button on the Recognition profile field. Then, perform the configurations according to the steps below:
Template
1. Click on the New template field and locate and select the .xml file that will be used as a template for the recognition configuration.
2. Click on Validate. The system will perform the validation from the associated .xsd files in the Quality control section and will inform if the xml was successfully validated or not.
3. Click on the Next button.
Indexes
In this step, the indexes that will be extracted from the XML file must be defined.
Use one of the following buttons to perform the configuration:
 |
Click on this button to import the indexes from another capture configuration with the "XML" document type. To do that, on the screen that will be displayed, locate and select the desired capture configuration and save the selection. |
 |
Click on this button to add an index for recognition. On the screen that will open, enter a name for the index and save the record. Repeat the procedure to add as many indexes as needed. |
After configuring the indexes, click on the Next button to go to the next step.
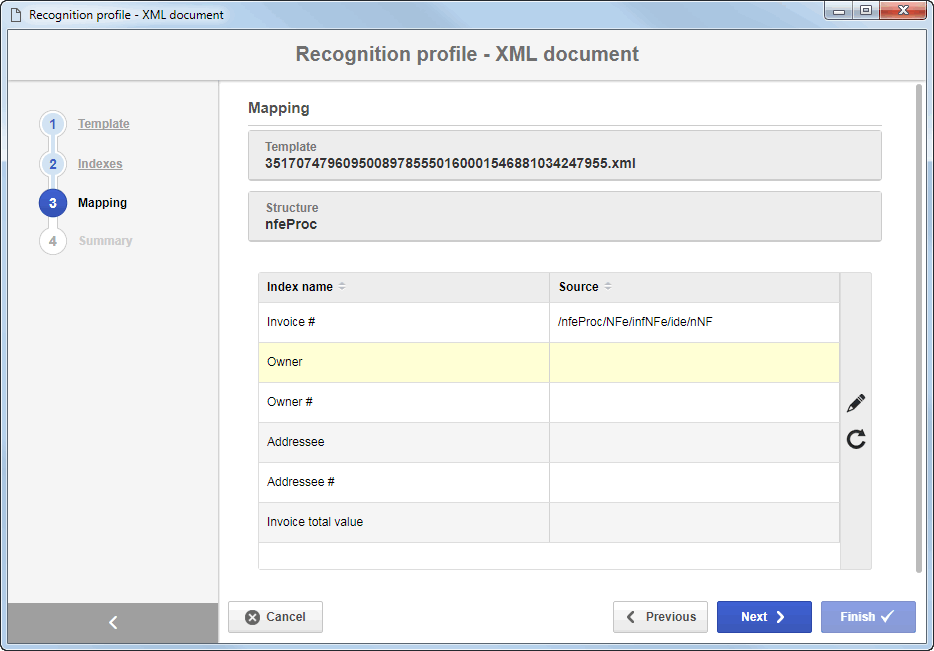
Mapping
In this step, it will be possible to configure the location from which the value of each index will be extracted in the .xml file. To do that, the .xsd file selected in the "Structure" field of the Quality control section will be used.
Still in this step, the indexes configured in the previous step will be displayed. Select the desired index in the Index name column and click on the  button on the side toolbar.
On the screen that will open, locate and select in the structure the source of the index data, and save the selection you made. Repeat this procedure with all indexes.
Summary
In this step, it is possible to view the data from the template file and the xml structure, as well as the indexes, the data source, and the recognized data (value extracted).
If necessary, return to the previous steps and perform the necessary adjustments. If all is correct, click on the Finish button. At this point, the configuration wizard will be closed.
Regardless of the document type, upon enabling the Automatic scheduling option, the recognition process is set to be executed automatically.
Conclusion
Thus, the Recognition section has been duly configured. For further information on the other configurations, refer to the Configuring the capture configuration details article.